Key Points
- a relatively open source mobile OS ( vs Apple )
- easier to customize the Apple
- Options to install, run Linux desktop OS on Android
References
Key Concepts
Android Debug from Windows or Mac using adb.exe
use google adb.exe tool
the process is a little work if you want to try.
https://pruvan.zendesk.com/hc/en-us/articles/202717265-How-to-get-an-Android-System-Log
basically there is a tool called ADB that can pull the log file from the device once you have it connected to your laptop for example.
How to get an Android System Log
Sometimes there's a hardware issue that is specific to a single device or a device model that we can not reproduce in our office. In these situations we will need a system log from the device that...
i can try to get you a log if you need one too from our cloud provider. i just need the exact device and OS version of Android and what build you want me to try
Sometimes there's a hardware issue that is specific to a single device or a device model that we can not reproduce in our office. In these situations we will need a system log from the device that is having the problem to try and figure out what is going wrong. These instructions can be used to create that log and send it to us.
1. Install your device driver
2. Connect your device
Plug in your device via USB to your computer
Go to your Settings app
Scroll down to the bottom and tap on Developer Options
Make sure Android Debugging is checked
3. Setup the log
Windows
Download Platform-tools from Google
Create a folder in your C drive called 'adb'
Unzip the Platform-tools zip file to this folder
Press the win+r on your keyboard
In the run window type cmd.exe and press enter
in the CMD window type 'cd c:\adb' and press enter
Type '
adb devices
' and press enter
This should write a line to the CMD window that says '009ab325109378df7e device' or something like that
If it says that there aren't any devices, then you need a different device driver
Type '
adb logcat > android.log
' and press enter
Mac OS
Download Platform-tools from Google
Create a folder in your hard drive called 'adb'
Unzip the Platform-tools zip file to this folder
Go to the Utilities folder and run Terminal
in the Terminal window type 'cd \adb' and press enter
Type 'adb devices' and press enter
This should write a line to the Terminal window that says '009ab325109378df7e device' or something like that
If it says that there aren't any devices, then you need a different device driver
Type '
adb logcat > android.log
' and press enter
4. Recreate the issue
Pick up your device
Open the your app to test
Take photos or do what every you need to in the app to create the error(s)
5. Finish up
Windows
Click inside of the CMD window on your computer
Press ctrl-c
Open a folder on your computer and go to C:\adb
Attach android.log to a reply email for your open ticket
Mac OS
Click inside of the Terminal window on your computer
Press cmd-c
Open your hard drive and go to the adb folder
Attach android.log to a reply email for your open ticket
Find USB debug drivers for different phones
Get USB debug driver for a phone if it didn’t automatically download on Windows USB connect
best site for Note 8 USB driver install
https://www.mobileheadlines.net/samsung-note-8-usb-driver/
Potential Value Opportunities
Ubuntu Options for Android devices
Options to Work on Hyperledger from an Android Phone
Option 1 - Use VNC client for Android and connect to an Ubuntu server
https://play.google.com/store/apps/details?id=com.realvnc.viewer.android&hl=en_US
or the free option
https://play.google.com/store/apps/details?id=android.androidVNC&hl=en
The server can be a local system, in your network or in the cloud
Pros:
- Simple to install and configure to any VNC server
- Works without changing your phone configuration, data or encryption
Cons:
- You need a VNC Connect account at RealVNC or use the optional VNC viewer above
- You need an Internet connection to access your remote server
Option 2 - Install Ubuntu server on your Android phone
Technorm notes to install Ubuntu server on Android phone
https://www.technorms.com/12451/install-ubuntu-on-android
or the free deployment tool option below
Maketecheasy article to install Ubuntu on Android with Linux Deploy
https://www.maketecheasier.com/install-ubuntu-on-android-linux-deploy/
Install Ubuntu server on your Android device
Pros:
- No cost - just suggested donation
- Full Ubuntu server runs anything on your phone ( including Hyperledger Fabric in theory )
Cons:
- Many - root the phone
- Complex install and support
- May require phone factory reset deleting apps, data and encryption
- Requires VNC server and client running to access Ubuntu desktop
- Requires high-end Android phone on new version of Android ( at least 8 GB memory )
- The Linux installer may be billable depending on which installer you choose
- No guarantees on the stability of Linux on Android
In my case, I run Ubuntu in Oracle VirtualBox on a Windows 10 PC fine.
I allocate 6 GB memory to Ubuntu and that is more than enough to run Hyperledger Fabric in a developer environment
Developers - Run Ubuntu server on Android - Options
Using a pre-made Ubuntu image, your phone creates a running version of Linux. There’s not much installed and it runs on LXDE to make sure everything fits within the phone’s memory. However, it is very much a legitimate copy of Linux.
The catch is that you can’t actually see Linux when it runs. The process is contained within an invisible set of programs that is not visible above the Android OS. In order to actually see Ubuntu in action, you need to use a VNC server app.
Ubuntu on Android - Ubuntu docs
https://docs.ubuntu.com/phone/en/devices/installing-ubuntu-for-devices
Warning - Do NOT use Ubuntu Touch option !! You want NORMAL Ubuntu and VNC access to the desktop
Warning: data loss of Android Apps, Data !!
Installing Ubuntu for devices deletes all data (including applications and data such as contacts, photos, and etc.) from the device.
An optional procedure is provided below that backs up the Android apps and data to a local file. There is no guarantee that a restore will succeed.
Warning: Must remove encryption and do Factory reset on phone !!
Warning: If your device is encrypted you must perform a full factory reset before installing ubuntu. This also will delete all data from the device, including apps and other data. You may want to create a backup first. You can perform a factory reset via the settings screen
Unlock the Android device ...
https://docs.ubuntu.com/phone/en/devices/installing-ubuntu-for-devices#unlock-the-android-device
H2S Media article - Install Ubuntu Server on Android Phone without Root privileges
https://www.how2shout.com/how-to/how-to-install-ubuntu-linux-on-android-without-root.html
Are you looking for a way to install and run Ubuntu 18.04 Linux server on your Android Smartphone or tablet without rooting the phone? Then try UserLAnd.
Android, being a very popular operating system users are keep looking for a way to easily install different Linux distros on it. Hitherto, it was very tedious work to run Linux OS on Android but not anymore. With the help of UserLand, we can install Kali, Ubuntu, Arch Linux, Debian like distros on Android in a minimal form. It provides built-in Shell and VNC sessions for a graphical experience. UserLand developed by the team of GNURoot Debian App which was very popular before, as a replacement.
Here we will show the way to install and run Ubuntu 18.04 minimal server on Android phone without any kind of rooting process. It helps you to learn Linux directly on your phone without voiding the warranty.
Note: The below-given steps also work for Debian and Kali Linux available in UserLAnd App.
Install Ubuntu Linux on android without root
Step 1: Download UserLAnd App
This app is available on Google Play store, here is the link to download it. There is no complications in its installation just like any other, open Play store on phone either use the here given link or search for UserLAnd and when appears, tap to install it.
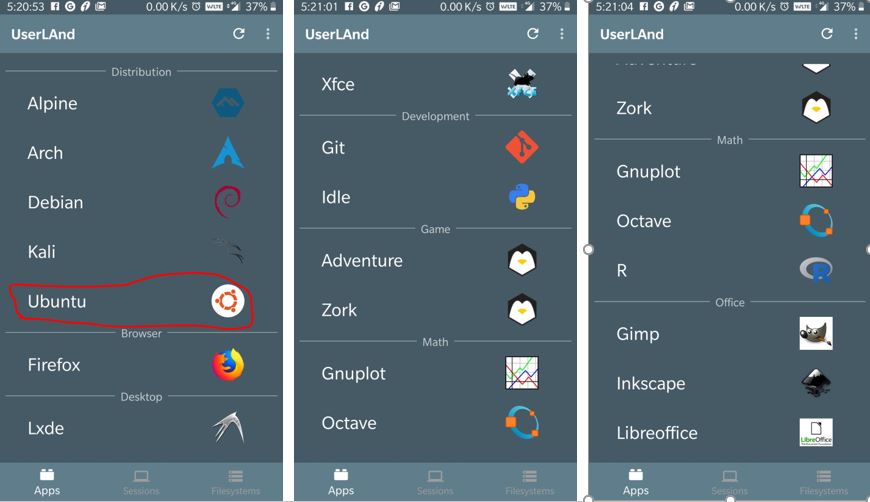
Step 2: Run UserLAnd to install Linux OS on Android
The moment, the app opens, you will see multiple Linux distros options along with their logos such as KALI Linux, Ubuntu, Alpine, Arch Linux, Debian along with lightweight Debian based Desktops with Xfce and Lxde desktop environment. It also has some Linux development, games and productivity apps. Well! here we are only about to focus on the process to run Ubuntu on Android. Tap on the Ubuntu icon.
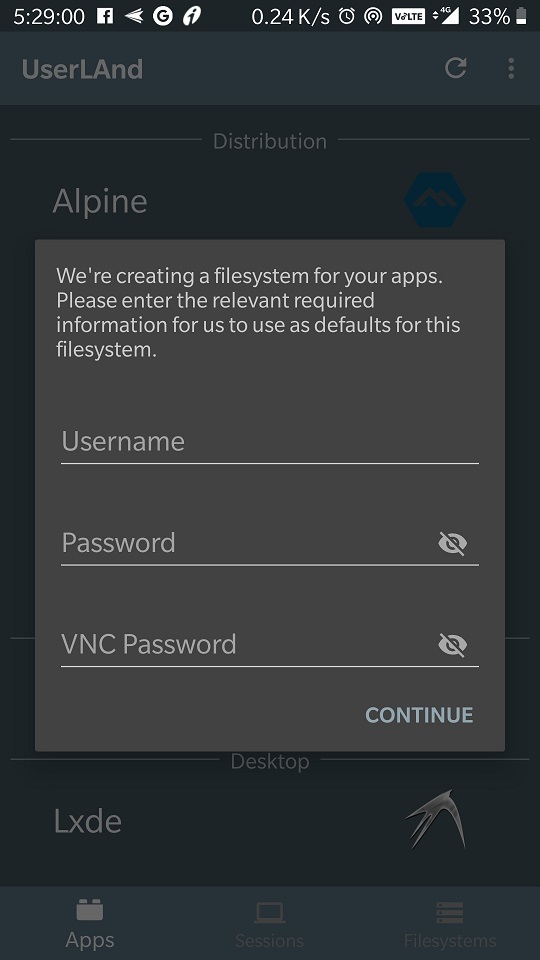
Step 3: Setup Username and Password for user and VNC
When you tap on the Ubuntu or any other Linux distros have given in UserLAnd, the first it will ask you to setup username, password and VNC password.
Type whatever you want and remember this will set as a standard user of your Android’s Ubuntu operating system. Once done, tap on the Continue option.
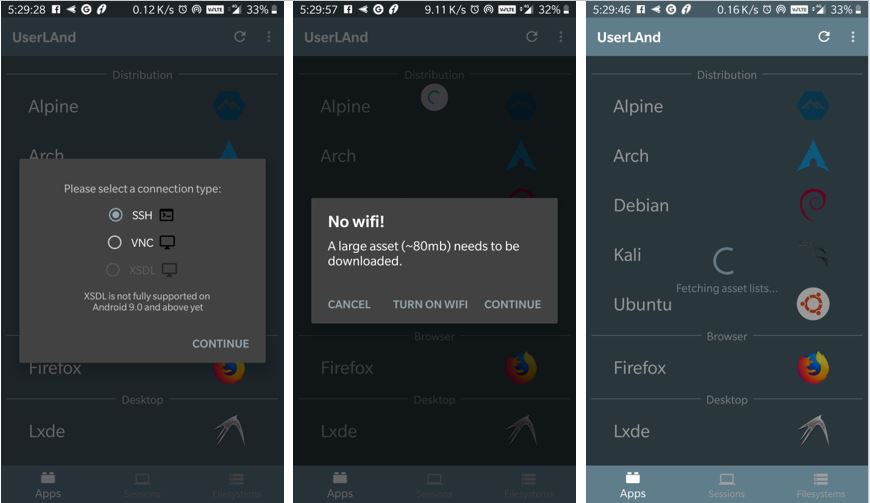
Step 4: Download Ubuntu for Android
The next thing which we need to select that how we would like to connect installed Linux OS Ubuntu on Android with SSH or VNC. I would like to use SSh which is simple and from the inbuilt terminal of UserLAnd, I can easily control my Linux operating system. We will also show later in this article how to use RealVNC to connect the existing Ubuntu, KALI or any other OS available on this Android application.
After that, it will say the files of Ubuntu to download on Android are of 80MB and would like to download it without Wifi, tap continue if you want to download them on mobile data. It will take a few minutes to set up all depend upon your internet connection speed.
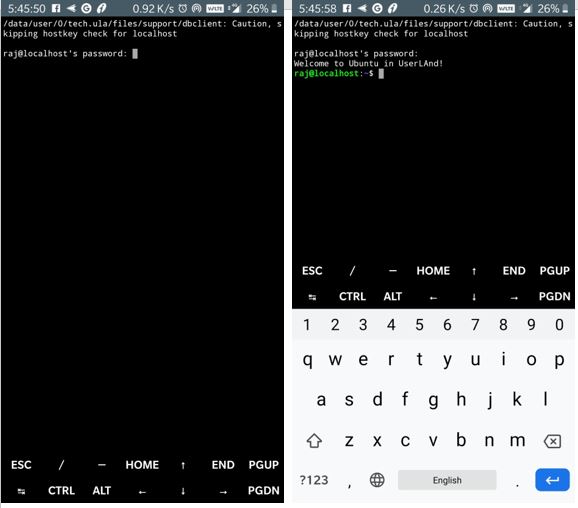
Step 5: Login to Android running Ubuntu
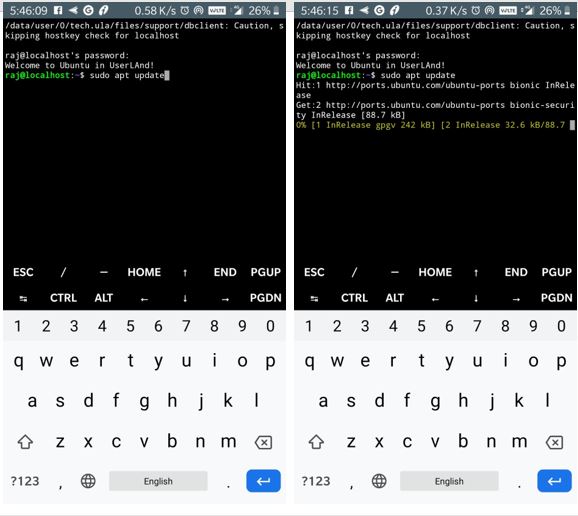
After the installation, as we have selected the SSH in the beginning, a terminal window will open. Now here just like regular Ubuntu server enter the password you have created above for your Ubuntu image running on Android.
Step 6: Update and Upgrade Ubuntu running on Android
Apart from the small screen and no init boot it is just like Windows 10 WSL, you will not feel any other differences on this Ubuntu Linux image, emulated on Android phone.
Thus, now we can use the keyboard to enter the command to our Linux. Let’s first update and upgrade all the packages of it. Run the following command
sudo apt-get update
sudo apt-get upgrade
Step 7: Set the root password for Ubuntu
As we know by default there is no password for the root user, so to set that use the following command:
sudo passwd root
Enter Unix Password two times that you want to set and it will be done…
Step 8: Install Linux Desktop Environment LXDE
By default, the OS will have only a command line interface and to give it some Graphical user interface, we need to install it manually. Here we are installing lightwieght LXDE for Ubuntu Linux to run GUI on Android phone.
sudo apt-get install lxde
Step 9: Setup VNC to access Ubuntu via GUI interface
Note: Running Linux GUI for Ubuntu on Android is not recommended unless you have high-end smartphone becuase it is laggy and also crash sometimes.
Well! still for the sake of tutorial I am telling you how to access and view installed LXDE Desktop on Ubuntu on Android.
On UserLAnd Ubuntu command line shell execute the following commands:
We can use XSDL Android app to access GUI desktop for Ubuntu but that is laggy and that’s why decided not to use, instead RealVNC viewer.
sudo apt install tightvncserver
Note: While installing it will ask you to set up an authentication password.
sudo vncserver :1 -geometry 1920x1080
Note: I am installing it on OnePlus5 and it has Full HD resolution and in the above command use your resolution.
sudo export DISPLAY=:1
startlxde &
Step 10: Install the RealVNC Android App
In the above step, we already have set up the Linux VNC server on Ubuntu and now its time to download Android app here called RealVNC Viewer- Remote Desktop.
Step 11: Connect VNC to Ubuntu LXDE Desktop
On VNC viewer tap on the + icon to create a new connection. Enter 127.0.01:5901 and Name of your installed OS, in my case it was raj. Then tap on the Create option.
As our connection is not encrypted it will warn that; here ignore this and simply tap on OK.
Now in Authentication enter the password that you have created while installing TightVNC server above.
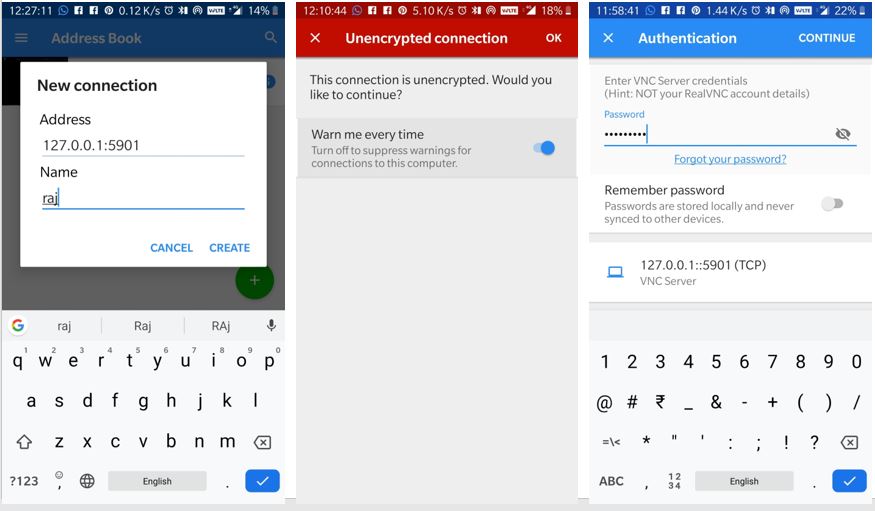
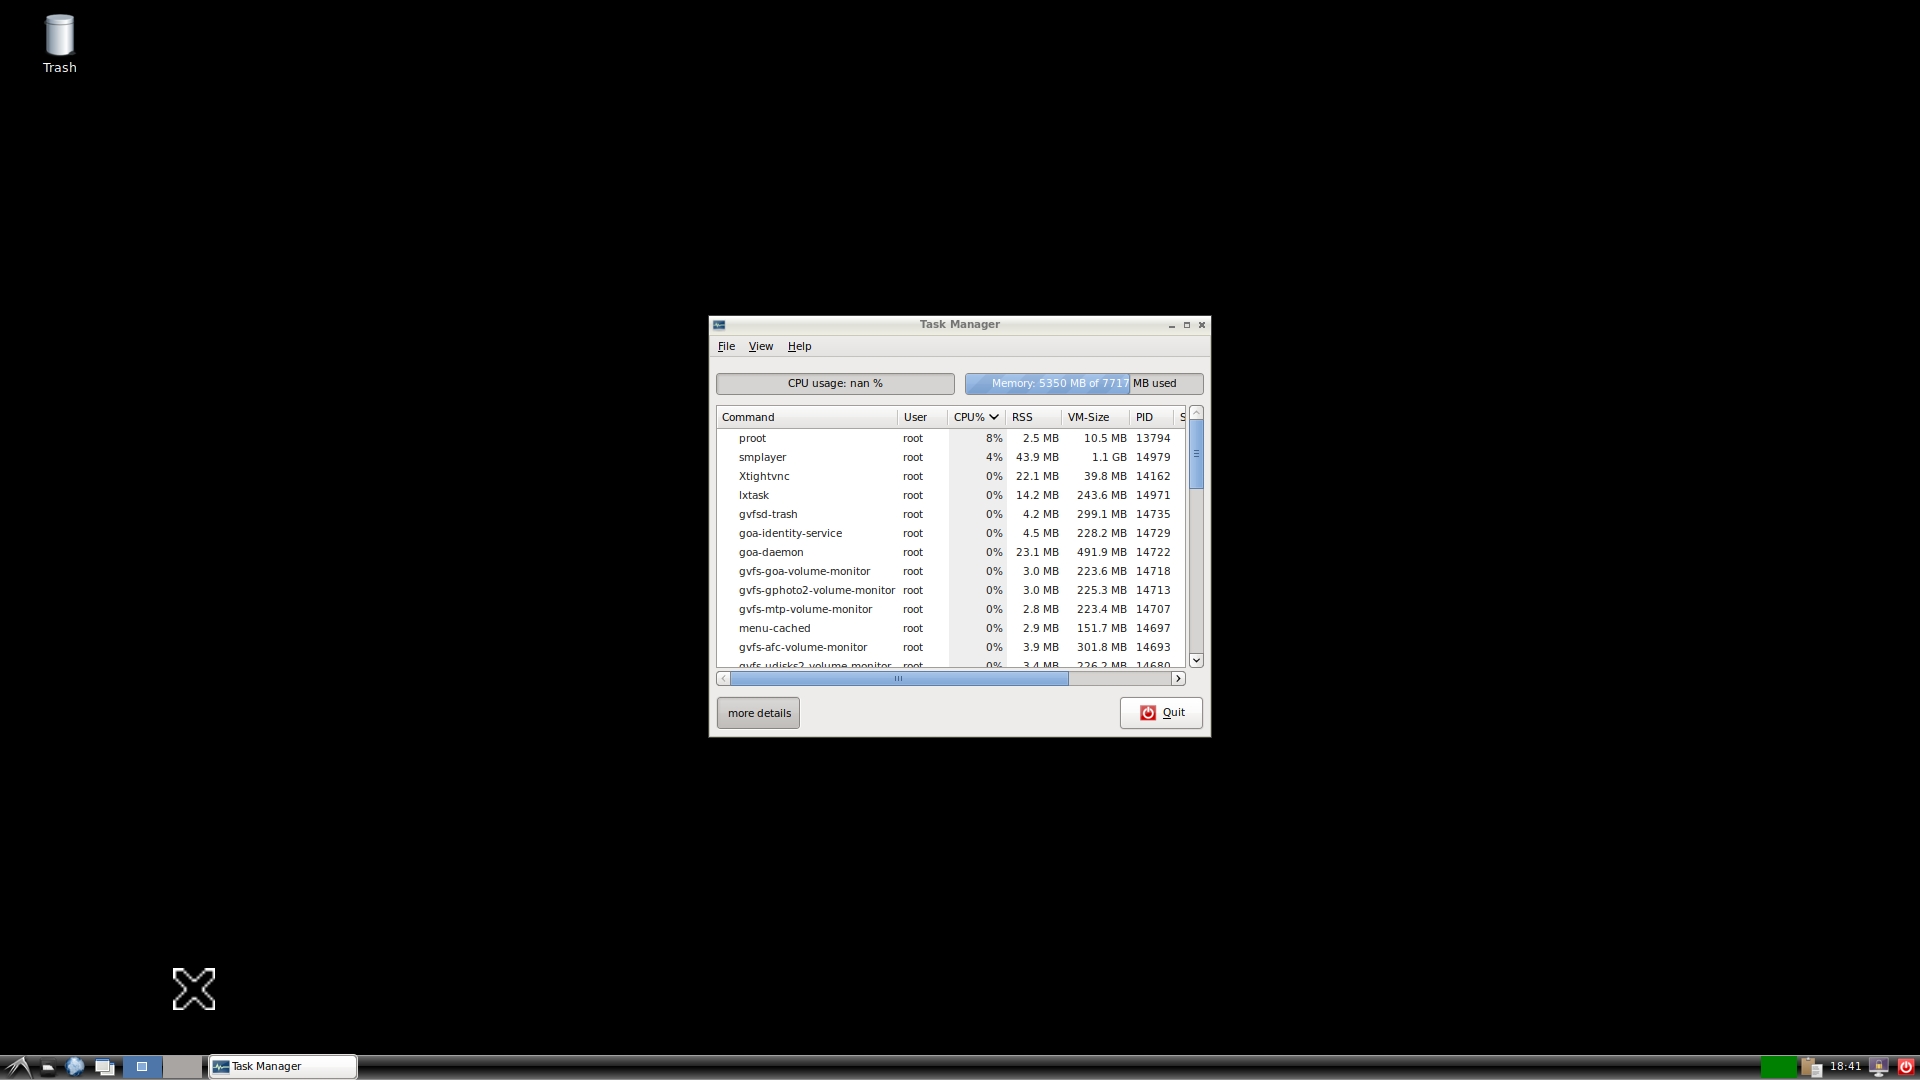
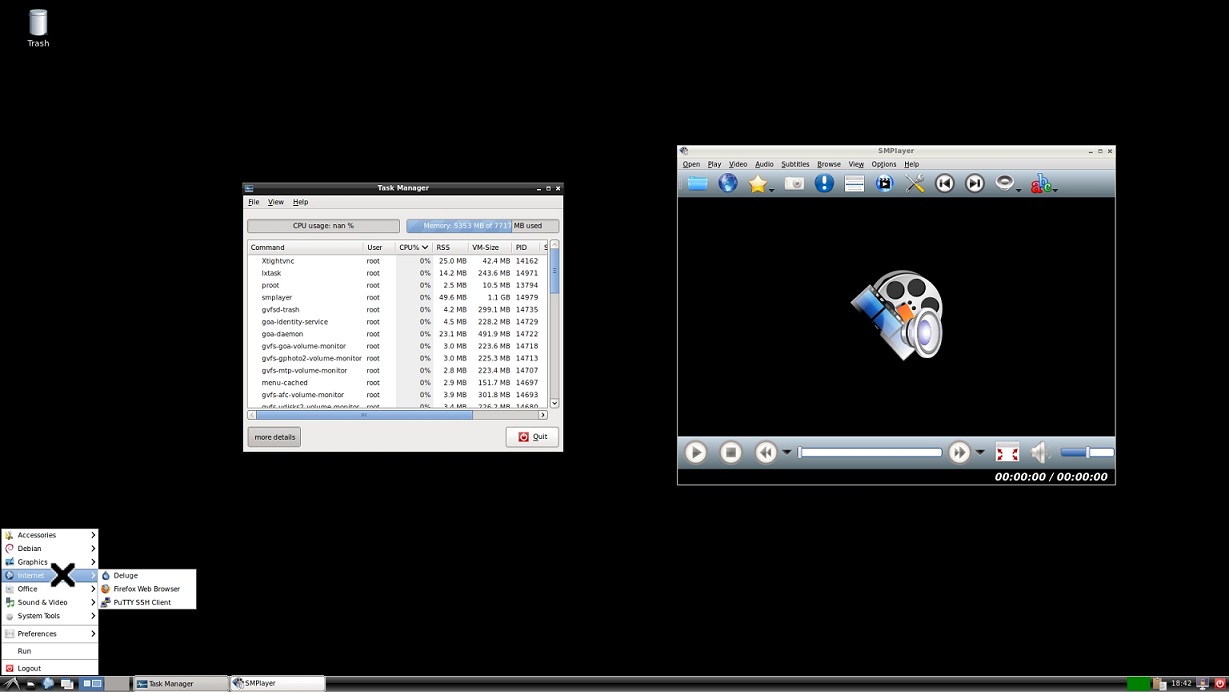
Finally, you will see the LXDE Linux Desktop environment on Android for the Ubuntu which further installed UserLAnd app on Android.
If you want to kill or stop the vncservice then use the below command:
sudo vncserver -kill
In this way, we can use this app to have Ubuntu for fun and experiment Linux on an Android phone or tablet.
DONE!!
Technorms article - Install Ubuntu on Android with Complete Linux Installer tool
https://www.technorms.com/12451/install-ubuntu-on-android
Use Complete Linux Installer tool - a billable software tool
https://play.google.com/store/apps/details?id=com.zpwebsites.linuxonandroid
With a root and a very large amount of storage space on the SD card, you can actually run a low-end version of Linux right there on your Android device. Seriously. This ingenious hack theoretically allows for several different versions of Linux, but we opted to go for Ubuntu. Believe it or not, it actually worked.
Install Ubuntu on Android
Background
Ubuntu can be installed on an Android phone by ingeniously linking two different apps within the same device. Fair warning: this hack is not intended for low-end Android phones. The app recommends at least 1 GHz of processing power. We also overclocked our phone with Tasker for the duration of running Linux.

Here’s what happens. Using a pre-made Ubuntu image, your phone creates a running version of Linux. There’s not much installed and it runs on LXDE to make sure everything fits within the phone’s memory. However, it is very much a legitimate copy of Linux.
The catch is that you can’t actually see Linux when it runs. The process is contained within an invisible set of programs that is not visible above the Android OS. In order to actually see Ubuntu in action, you need to use a VNC server app.
VNC (virtual network computing) is used for remotely viewing another PC over a network. You can use a basic VNC app to view the local OS, which in this case is Ubuntu. With those two apps linked together, Linux runs right there on Android.
Materials Needed
- A Nandroid backup
- A kernel that supports loop devices. Unfortunately, there is no way to check for this other than trying the installation. If you run up against a seemingly insurmountable wall, this may be the issue.
- Root access (duh)
- Busybox. Download the app Busybox Installer and use it to install the latest version of Busybox. You may have to run the installer twice to make sure that it really installs.
- Enable USB debugging. Go to Settings > Apps > Development and check the box for debugging.
- A solid Wi-Fi connection. You’ll download a lot of files, and it’s best to not do it over data.
- Storage space. The Ubuntu image requires 2.5 GB, but it’s best to have 3.
- A file browser app that can unzip compressed files. Astro File Manager does this and is free.
- VNCviewer
- Android Terminal Emulator
- Try Complete Linux Installer – Ubuntu Installer Free is no longer available.
Installation
The first step, as always before any serious Android hack, is to reboot into recovery and make a Nandroid backup. This step is absolutely critical and should never be skipped. If something happens and messes up your phone, that backup is the only safeguard.

Now open the Ubuntu Installer Free app. It will contain instructions as well for installing. Tap “Install Guide." Check that you’ve followed all the instructions listed and hit next.
In order to run Ubuntu, you need two critical files, the boot script and the image. The “large" Ubuntu image is an extra 1 GB but comes with more programs already installed. We chose the “small" one simply because you can always install more programs later. However, you will need the boot script no matter which image you pick.
Download these files. It will take a while, so find something else to do. Water a plant. Paint a sunset. Or just watch Battlestar Galactica reruns on Netflix. Guess which one we did?
When everything has downloaded, open up that file browser and create a folder labeled “ubuntu" (without the quotation marks) in the root of the SD card. Cut and paste the boot script and image into this new folder. Extract the contents of both files into /sdcard/ubuntu. This too will take a while.

Now exit the file browser and go to the Terminal app. We recommend switching off any sort of autocorrect feature you might have for your keyboard. Linux text commands are not grammatically correct by any stretch of the imagination and certainly did not play nicely with our autocorrect in Perfect Keyboard.
Type these commands (hit enter between lines and grant Terminal root access when it asks):
su
cd /sdcard/ubuntu
sh ubuntu.sh

Next Terminal will ask for your screen size. This can be found by searching “(phone model) specs" on Google. Our original HTC Evo 4G has a resolution of 800×480, so we input “800×480" (with no quotes) and hit enter.
A lot of text should scroll by at this point. If all works out, the text will end with a message saying “root@localhost:/#". This means that Linux is up and running. If it doesn’t say that, double check that Busybox is installed. We ran into that issue.
Congratulations! Ubuntu is now running. You may not be able to see it, but it’s running. The Terminal app now functions as the command line for the OS. The in-OS command prompt app does not work.

In order to actually see your brand new OS, open the Android VNC app. Set the IP address to localhost. The port number should already be 5900. Put in the password as “ubuntu" (no quotes). Skip the username section and set the color format to 24-bit color. Once all that is set up, tap connect.
Linux should now appear in all its LXDE glory. To exit at any time, type “exit" (no quotes, as always) into Terminal.
Life After Installation
The first and most obvious problem is that Linux is a desktop OS, definitely not something meant for touch screens. Tap menu and change the control scheme to touch pad, which makes the touch screen function as a basic mouse. The controls are by no means perfect, but they work.

To be honest, this hack works best on tablets. We really struggled to use Linux on our microscopically small phone screen. Even with an easy zoom function, Ubuntu is not easy to use. Side note: To input text, hold down the menu key. That brings up a virtual keyboard. However, we could easily see someone using a physical keyboard and a tablet with this hack in order to make a facsimile desktop PC.
Final Thoughts
It’s not too difficult to install Ubuntu on Android, and it’s certainly not the friendliest of OSes (even by Linux standards), but it is pretty damn neat. Not to mention that all the things normally restricted on mobile devices (like Hulu, The Daily Show and Spotify) are now fair game. No doubt hardcore geeks will find some creative uses for this hack.
Maketecheasy article - Install Ubuntu on Android with Linux Deploy
https://www.maketecheasier.com/install-ubuntu-on-android-linux-deploy/
Uses Linux Deploy a free Linux installer for Android.
https://play.google.com/store/apps/details?id=ru.meefik.linuxdeploy
It’s easy to forget that Android is a Linux-based operating system sometimes. But it is, and it retains some of that openness and flexibility that attracts people to the Linux platform.
As an example, you can actually install a full Linux distro on your Android device. We’ll demonstrate how to install Ubuntu on Android using an app called Linux Deploy, which will install the Linux desktop environment, but you can use this same method to install Debian or various other Linux distros.
Note: you’ll need to root your Android device before starting this process.
Install and Deploy Linux on Android
First, install BusyBox. This is a toolkit that unlocks your Android phone for various Linux commands that are essential to getting Ubuntu up and running. You won’t need to actively use this after installing it.
You’ll also need VNC Viewer, a remote desktop app that creates the window within which Ubuntu will run on your Android device. This is what you’ll ultimately be using to get Linux up and running.
Finally, you need to install Linux Deploy, which you’ll use to install Ubuntu (or one of several different versions of Linux, for that matter).
After installing Linux Deploy, open it and tap the icon with the three sliders (bottom-right corner).
Here you can select the Linux distro you want to install. (Just tap “Distribution,” then select the distro name – we went with Ubuntu.)

After that, scroll to the GUI section at the bottom, tap the “Enable” box and make sure “VNC” is selected under “Graphics subsystem.”

Once you’ve done that, you can also go into “GUI Settings” to set the resolution of Linux once it runs. Unless you have a tablet, the default 1920 x 1080 resolution on most smartphones is probably too high to practically use Linux, so we recommend lowering it to 1024×576 or 1152×648.

Finally, scroll back up about halfway until you find “User name” and “User password.” Make a note of them, or replace them with your own.

Those are all the settings you need to tweak. Go back to the Linux Deploy home screen, tap the three-dotted menu icon at the top-right and tap “Install.”

The installation may take from one to several minutes, depending on the speed of your smartphone.
Once it’s finished (denoted by the “<<<deploy” message at the bottom of the install log), tap Start at the bottom-left corner, then “OK.” Once you see the message “<<< Start” at the bottom of the log, Linux is deployed and running.
Run Linux on Android
But in order to actually see and use Linux, you need to use VNC Viewer. Open VNC Viewer, tap the green “+” icon at the bottom-right, then in the “New connection” box enter “localhost” as an address, and give the connection a name of your choice. (We went with “Linux.”) Click “Create.”

Tap the new connection in VNC Viewer to open it, and your Linux build should open up!

It won’t have anything installed on it by default, but you can go to the Terminal and sudo apt-get install various software like you normally would in Linux.
Conclusion
That’s it. You now have a fully functional Linux distro on your Android device.

If at any point you decide that you don’t want Linux any more, it’s not a case of uninstalling Linux Deploy. Instead, you’ll need to use a file explorer with root access (we used Root Browser), find the directory “/data/user/0/ru.meefik.linuxdeploy/env” and delete it. (You can change the default Linux install directory in Linux Deploy’s settings menu).
Run VNC Server on Android or on Ubuntu on Android
https://www.realvnc.com/en/connect/download/viewer/android/
You can also use Google Play to download this app to the phone.
Download VNC® Viewer to the device you want to control from, below. Make sure you've installed VNC® Server on the computer you want to control.
You can also run the VNC client on Android as well.
This allows you to access a Linux OS Desktop running from your Android device in theory.
You run VNC server for Linux on Ubuntu
You run VNC client on Android or Ubuntu
In theory you have access to the Ubuntu Deskop via the VNC client app
Potential Challenges
i>>> Some phone calls go straight to voice mail
https://forums.att.com/conversations/samsung/incoming-calls-go-straight-to-voice-mail/61d218446b1b701f6262e59b
First, try reset your network settings to refresh your connection to our network as you stated you were recently out of the country.
- iPhone: Settings>General>Reset>Reset network settings
- Android: Settings>General Management>Reset>Reset network settings
Next you would want to check your Call Forwarding Settings. Your incoming calls could be forwarded to your voicemail.
If you are still unable to receive calls we would then suggest running your device through our Troubleshooting Tool.
- Under Fix an Issue select Phone Calls.
Let the tool walk you through some troubleshooting steps. This will provide you with our top resolutions.
how to find out what software is blocking calls on Android?
a>> called ATT to remove the ActiveArmour service
https://support.google.com/files/thread/220418084/my-phone-keeps-blocking-me-from-calling-numbers?hl=en#:~:text=Call%20blocking%20feature%3A%20Your%20phone,feature%20is%20enabled%2C%20disable%20it.
https://www.pcmag.com/how-to/block-robocalls-and-spam-calls#:~:text=Some%20Android%20devices%20also%20allow,numbers%20that%20you%20want%20blocked.
Candidate Solutions
Download Custom Android Apps to Android Device to test on Android Auto
https://developer.android.com/training/cars/testing
Test in real vehicles
To test your app in real vehicles, it must be installed from a trusted source such as the Play Store, with one exception detailed in Allow unknown sources. You can use Internal App Sharing or an Internal Test Track to distribute your app to devices without going through the Play Store review process.
Allow unknown sources
On Android Auto, there is also a developer option to enable running apps not installed from a trusted source. This setting only applies to media and messaging apps and doesn't apply to apps built using the Android for Cars App Library.
Enable Android Auto developer mode
In addition to the Android developer options (usable on both Android Auto and Android Automotive OS), Android Auto has its own developer mode that can be used to improve the development experience. To enable it, follow these steps:
Open the Android Auto settings.
- Android 10 or higher: on the device, tap Settings > Apps & notifications > See all apps > Android Auto > Advanced > Additional settings in the app.
- Android 9 or lower: in the Android Auto app, tap the menu, then tap Settings.
Scroll to the About section near the bottom and tap Version to display the version and permission information.
Tap the Version and permission info section 10 times.
The Allow development settings? dialog appears.
Tap OK.
Developer mode is now enabled, and you can access developer options in the overflow menu. You only need to enable developer mode once. To quit developer mode, use the option from the drop-down menu in the app bar.
ATT store North Attleboro
508 695 9650
Samsung zfold 4
https://www.youtube.com/watch?v=rSQ8fIwhgU8
- in settings > advanced features > side key << set the option to power menu instead of bixby
- press and hold the power button side key for 10 seconds or more
has 2 nano slim slots and a esim capability
up to 3 phone numbers can be assigned to the z fold4
has a single cable
no charger
how fast does xfer work old to new phone?
do I need a new IMEI card or do we just move the line to the new IMEI address in the phone?
don't have a case
don't have an spen - coming with samsung case
ATT transfer old phone data to new phone
https://www.att.com/support/article/wireless/KM1000927
phone data transfer
https://www.att.com/support/article/wireless/KM1000927
phone activation
https://www.att.com/help/wireless/get-started/
sim card install instructions - order the right card or use esim download
https://www.att.com/support/article/wireless/KM1081808/
sim card install video
https://www.google.com/search?q=z+fold+4+install+sim+card&oq=z+fold+4+install+sim+card&aqs=chrome..69i57j69i64.6262j0j7&sourceid=chrome&ie=UTF-8

Samsung zfold 4 cases
https://www.androidauthority.com/best-samsung-galaxy-z-fold-4-cases-3194634/
cases w stands
Spigen Neo Hybrid S Designed for Galaxy Z Fold 4 Case (2022) - Black
https://www.amazon.com/Spigen-Hybrid-Designed-SP761-Case/dp/B09ZMQCHGN?tag=at88bagc-20&th=1&geniuslink=true
external bluetooth keyboard - folds
fireCable Foldable Pocket Keyboard and Touchpad Mouse (for DeX Station Galaxy S22 Ultra Note & Z Fold Series etc.)
https://www.amazon.com/fireCable-Foldable-Keyboard-Touchpad-Station/dp/B07H1Q7BCG
Step-by-step guide for Example
sample code block
Recommended Next Steps
Related articles