m MongoDb usage basics
- jim mason
- jimm1
Key Points
References
| Reference_description_with_linked_URLs_______________________ | Notes______________________________________________________________ |
|---|---|
| m MongoDB | |
| m Mongoose for MongoDb | |
| https://medium.com/free-code-camp/learn-mongodb-a4ce205e7739 | MongoDb get started |
| https://docs.mongodb.com/compass/current/import-export | Compass tool docs |
| https://kb.objectrocket.com/mongo-db/how-to-bulk-insert- multiple-documents-to-a-mongodb-collection-using-python-352 | Python - insert docs into Mongo |
Key Concepts
MongoDB quick start article - freecodecamp
https://medium.com/free-code-camp/learn-mongodb-a4ce205e7739
MongoDB is a rich document-oriented NoSQL database.
If you are a complete beginner to NoSQL, I recommend you to have a quick look at my NoSQL article published previously.
Today, I wanted to share some of the basic stuff about MongoDB commands such as querying, filtering data, deleting, updating and so on.
Okay, enough of the talk, let’s get to work!
Configuration 🔧
In order to work with MongoDB, first you need to install MongoDB on your computer. To do this, visit the official download center and download the version for your specific OS. Here, I’ve used Windows.
After downloading MongoDB community server setup, you’ll go through a ‘next after next’ installation process. Once done, head over to the C drive in which you have installed MongoDB. Go to program files and select the MongoDB directory.
C: -> Program Files -> MongoDB -> Server -> 4.0(version) -> binIn the bin directory, you’ll find an interesting couple of executable files.
- mongod
- mongo
Let’s talk about these two files.
mongod stands for “Mongo Daemon”. mongod is a background process used by MongoDB. The main purpose of mongod is to manage all the MongoDB server tasks. For instance, accepting requests, responding to client, and memory management.
mongo is a command line shell that can interact with the client (for example, system administrators and developers).
Now let’s see how we can get this server up and running. To do that on Windows, first you need to create a couple of directories in your C drive. Open up your command prompt inside your C drive and do the following:
C:\> mkdir data/db
C:\> cd data
C:\> mkdir db
The purpose of these directories is MongoDB requires a folder to store all data. MongoDB’s default data directory path is /data/db on the drive. Therefore, it is necessary that we provide those directories like so.
If you start the MongoDB server without those directories, you’ll probably see this following error:

trying to start mongodb server without \data\db directories
After creating those two files, head over again to the bin folder you have in your mongodb directory and open up your shell inside it. Run the following command:
mongodVoilà! Now our MongoDB server is up and running! 😎
In order to work with this server, we need a mediator. So open another command window inside the bind folder and run the following command:
mongoAfter running this command, navigate to the shell which we ran mongod command (which is our server). You’ll see a ‘connection accepted’ message at the end. That means our installation and configuration is successful!
Just simply run in the mongo shell:
db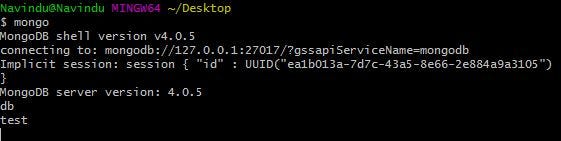
initially you have a db called ‘test’
Setting up Environment Variables
To save time, you can set up your environment variables. In Windows, this is done by following the menus below:
Advanced System Settings -> Environment Variables -> Path(Under System Variables) -> EditSimply copy the path of our bin folder and hit OK! In my case it’s C:\Program Files\MongoDB\Server\4.0\bin
Now you’re all set!
Working with MongoDB
There’s a bunch of GUIs (Graphical User Interface) to work with MongoDB server such as MongoDB Compass, Studio 3T and so on.
They provide a graphical interface so you can easily work with your database and perform queries instead of using a shell and typing queries manually.
But in this article we’ll be using command prompt to do our work.
Now it’s time for us to dive into MongoDB commands that’ll help you to use with your future projects.
- Open up your command prompt and type
mongodto start the MongoDB server.
2. Open up another shell and type mongo to connect to MongoDB database server.
1. Finding the current database you’re in
db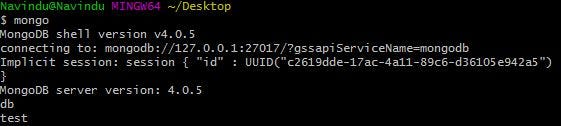
This command will show the current database you are in. test is the initial database that comes by default.
2. Listing databases
show databases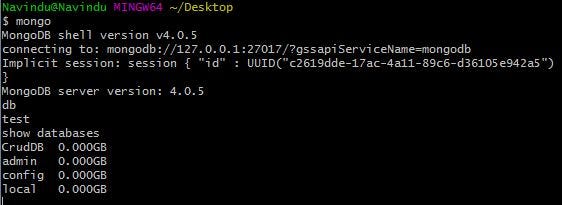
I currently have four databases. They are: CrudDB, admin, config and local.
3. Go to a particular database
use <your_db_name>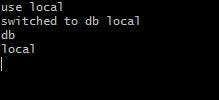
Here I’ve moved to the local database. You can check this if you try the command db to print out the current database name.
4. Creating a Database
With RDBMS (Relational Database Management Systems) we have Databases, Tables, Rows and Columns.
But in NoSQL databases, such as MongoDB, data is stored in BSON format (a binary version of JSON). They are stored in structures called “collections”.
In SQL databases, these are similar to Tables.

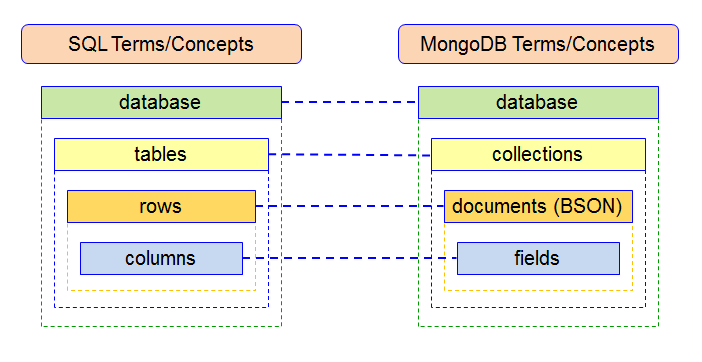
SQL terms and NoSQL terms by Victoria Malaya
Alright, let’s talk about how we create a database in the mongo shell.
use <your_db_name>Wait, we had this command before! Why am I using it again?!
In MongoDB server, if your database is present already, using that command will navigate into your database.
But if the database is not present already, then MongoDB server is going to create the database for you. Then, it will navigate into it.
After creating a new database, running the show database command will not show your newly created database. This is because, until it has any data (documents) in it, it is not going to show in your db list.
5. Creating a Collection
Navigate into your newly created database with the use command.
Actually, there are two ways to create a collection. Let’s see both.
One way is to insert data into the collection:
db.myCollection.insert({"name": "john", "age" : 22, "location": "colombo"})This is going to create your collection myCollection even if the collection does not exist. Then it will insert a document with name and age. These are non-capped collections.
The second way is shown below:
2.1 Creating a Non-Capped Collection
db.createCollection("myCollection")2.2 Creating a Capped Collection
db.createCollection("mySecondCollection", {capped : true, size : 2, max : 2})In this way, you’re going to create a collection without inserting data.
A “capped collection” has a maximum document count that prevents overflowing documents.
In this example, I have enabled capping, by setting its value to true.
The size : 2 means a limit of two megabytes, and max: 2 sets the maximum number of documents to two.
Now if you try to insert more than two documents to mySecondCollection and use the find command (which we will talk about soon), you’ll only see the most recently inserted documents. Keep in mind this doesn’t mean that the very first document has been deleted — it is just not showing.
6. Inserting Data
We can insert data to a new collection, or to a collection that has been created before.
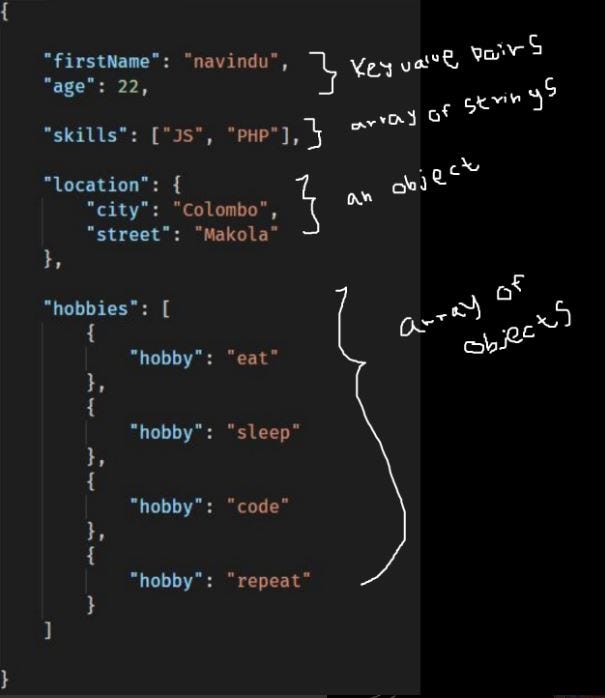
ways data can be stored in a JSON
There are three methods of inserting data.
insertOne()is used to insert a single document only.insertMany()is used to insert more than one document.insert()is used to insert documents as many as you want.
Below are some examples:
- insertOne()
db.myCollection.insertOne(i
      {
       "name": "navindu",
       "age": 22
      }
)- insertMany()
db.myCollection.insertMany([
      {
        "name": "navindu",
        "age": 22
      },
The insert() method is similar to the insertMany() method.
Also, notice we have inserted a new property called location on the document for John Doe. So if you use find, then you’ll see only for john doe the location property is attached.
This can be an advantage when it comes to NoSQL databases such as MongoDB. It allows for scalability.
Successfully inserted data
7. Querying Data
Here’s how you can query all data from a collection:
db.myCollection.find()
result
If you want to see this data in a cleaner, way just add .pretty() to the end of it. This will display document in pretty-printed JSON format.
db.myCollection.find().pretty()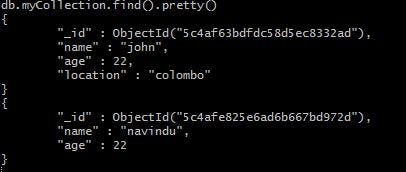
result
Wait...In these examples did you just notice something like _id? How did that get there?
Well, whenever you insert a document, MongoDB automatically adds an _id field which uniquely identifies each document. If you do not want it to display, just simply run the following command
db.myCollection.find({}, _id: 0).pretty()Next, we’ll look at filtering data.
If you want to display some specific document, you could specify a single detail of the document which you want to be displayed.
db.myCollection.find(
        {
          name: "john"
        }
)
result
Let’s say you want only to display people whose age is less than 25. You can use $lt to filter for this.
db.myCollection.find(Similarly, $gt stands for greater than, $lte is “less than or equal to”, $gte is “greater than or equal to” and $ne is “not equal”.
querying for a set of values with $in
db.myCollection.find({"userName": {$in: ["lee","sky"]}})Joining collections on a query with $lookup
https://www.w3schools.com/nodejs/nodejs_mongodb_join.asp
var MongoClient = require('mongodb').MongoClient;
var url = "mongodb://127.0.0.1:27017/";

MongoClient.connect(url, function(err, db) {
  if (err) throw err;
  var dbo = db.db("mydb");
  dbo.collection('orders').aggregate([
    { $lookup:
       {
         from: 'products',
         localField: 'product_id',
         foreignField: '_id',
         as: 'orderdetails'
       }
     }
    ]).toArray(function(err, res) {
    if (err) throw err;
    console.log(JSON.stringify(res));
    db.close();
  });
});
Lookup results
[
{ "_id": 1, "product_id": 154, "status": 1, "orderdetails": [
{ "_id": 154, "name": "Chocolate Heaven" } ]
}
]
Query with sort in Nodejs ( Compass export )
/*
* Requires the MongoDB Node.js Driver
* https://mongodb.github.io/node-mongodb-native
*/

const filter = {
'createdAt': {
'$gte': new Date('Tue, 09 Feb 2021 00:00:00 GMT')
}
};
const sort = {
'createdAt': -1
};

MongoClient.connect(
'mongodb+srv://dbAdmin:u3KpFTzZBEIEQLzY@cluster0.pfjbe.mongodb.net/test?authSource=admin&replicaSet=atlas-2k4bdt-shard-0&readPreference=primary&appname=MongoDB%20Compass&ssl=true',
{ useNewUrlParser: true, useUnifiedTopology: true },
function(connectErr, client) {
assert.equal(null, connectErr);
const coll = client.db('ebc_dev').collection('transactions');
coll.find(filter, { sort: sort }, (cmdErr, result) => {
assert.equal(null, cmdErr);
});
client.close();
});
8. Updating documents
Let’s say you want to update someone’s address or age, how you could do it? Well, see the next example:
db.myCollection.update({age : 20}, {$set: {age: 23}})The first argument is the field of which document you want to update. Here, I specify age for the simplicity. In production environment, you could use something like the _id field.
It is always better to use something like _id to update a unique row. This is because multiple fields can have same age and name. Therefore, if you update a single row, it will affect all rows which have same name and age.


result
If you update a document this way with a new property, let’s say location for example, the document will be updated with the new attribute. And if you do a find, then the result will be:


result
If you need to remove a property from a single document, you could do something like this (let’s say you want age to be gone):
db.myCollection.update({name: "navindu"}, {$unset: age});9. Removing a document
As I have mentioned earlier, when you update or delete a document, you just need specify the _id not just name, age, location.
db.myCollection.remove({name: "navindu"});9b. Removing many documents
db.orders.deleteMany({createdAt: {$gte: ISODate('2109-12-15')}},{w: "majority", j: true})

db.orders.deleteMany({},{w: "majority", j: true})

db.payments.deleteMany({},{w: "majority", j: true})

db.purchasetransactions.deleteMany({},{w: "majority", j: true})

db.purchaseitemhistories.deleteMany({},{w: "majority", j: true})
10. Removing a collection
db.myCollection.remove({});Note, this is not equal to the drop() method. The difference is drop() is used to remove all the documents inside a collection, but the remove() method is used to delete all the documents along with the collection itself.
Logical Operators
MongoDB provides logical operators. The picture below summarizes the different types of logical operators.
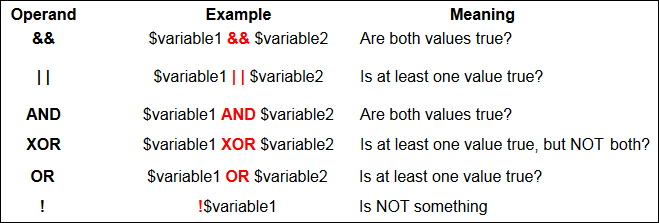
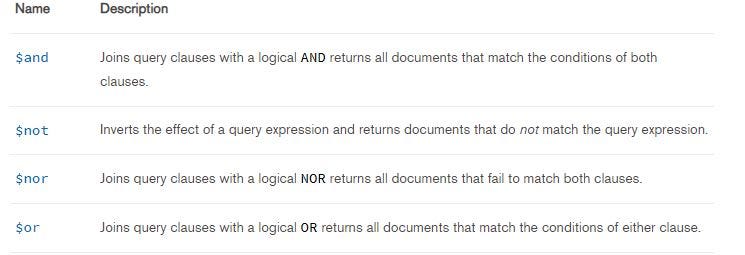
reference: MongoDB manual
Let’s say you want to display people whose age is less than 25, and also whose location is Colombo. What we could do?
We can use the $and operator!
db.myCollection.find({$and:[{age : {$lt : 25}}, {location: "colombo"}]});Last but not least, let’s talk about aggregation.
Aggregation
A quick reminder on what we learned about aggregation functions in SQL databases:
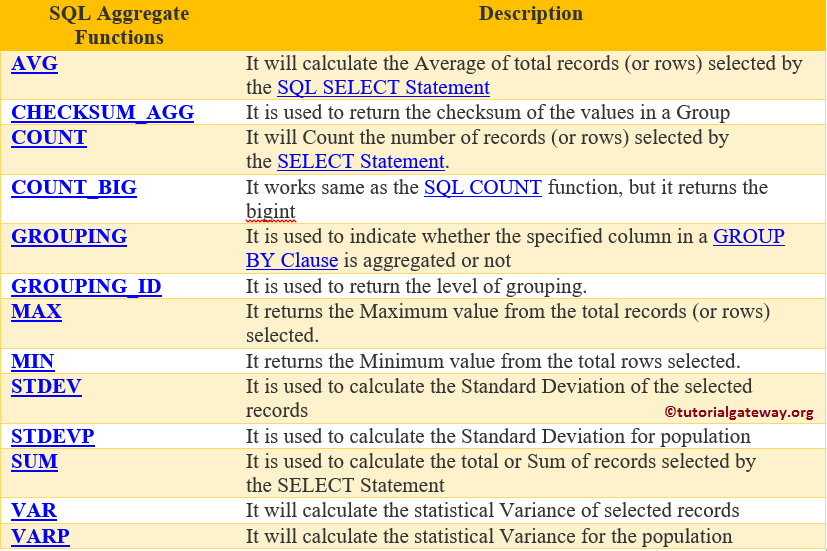
aggregation functions in SQL databases. ref : Tutorial Gateway
Simply put, aggregation groups values from multiple documents and summarizes them in some way.
Imagine if we had male and female students in a recordBook collection and we want a total count on each of them. In order to get the sum of males and females, we could use the $group aggregate function.
db.recordBook.aggregate([
                {
                  $group : {_id : "$gender", result: {$sum: 1}}
} 
result
Map-Reduce
Full Nodejs example - read Mongo document by _id, update by _id
/*
ebc-energy-device-load1.js

https://docs.mongodb.com/drivers/node/quick-start
https://docs.mongodb.com/drivers/node/
https://docs.mongodb.com/drivers/node/usage-examples
find by ObjectId ex
https://docs.mongodb.com/drivers/node/usage-examples/findOne
https://kb.objectrocket.com/mongo-db/nodejs-mongodb-find-by-id-686
https://docs.mongodb.com/drivers/node/usage-examples/updateOne
https://docs.mongodb.com/drivers/node/usage-examples/replaceOne
https://www.w3schools.com/nodejs/nodejs_mongodb_find.asp
https://www.w3schools.com/nodejs/default.asp
https://www.w3schools.com/nodejs/nodejs_filesystem.asp
https://wesbos.com/destructuring-objects

*/
var atitle = "\n ebc-energy-device-load1.js - load energy csv file to mongo devices \n";
console.log(`${atitle}`);

const { MongoClient } = require("mongodb");
const { ObjectId } = require("mongodb").ObjectId;
const {fs} = require("fs");


var astep = "start";
const uri = "mongodb+srv://dbAdmin:u3KpFTzZBEIEQLzY@cluster0.pfjbe.mongodb.net/test-db";
const connectOptions = {useUnifiedTopology: true};
const client = new MongoClient(uri,connectOptions);
var collection = null;
var device = null;
var database = null;
var storageKWH, _id, deviceName, deviceGroup, sumKWH;


async function run() {
try {
await client.connect();
database = client.db("test-db");
collection = database.collection("devices");

await loadEnergyToDevice();

} finally {
await client.close();
}
};


async function loadEnergyToDevice() {
try {

await queryDevice();
var {_id, deviceName, deviceGroup, storageKWH} = device;
console.log(`device found = ${deviceName} _id: ${_id}`);

sumKWH = storageKWH + 75;
console.log(` after energy load, sum of storageKWH = ${sumKWH}`);

await updateDevice(device, sumKWH);
console.log(`device energy load completed`);

} catch(err) {
console.log(err);
}
};


// https://docs.mongodb.com/drivers/node/usage-examples/findOne
async function queryDevice() {
console.log(`queryDevice called`);
// Query for a movie that has the title 'The Room'
// var query = { deviceName: "solar panel 3000 MW v4" };
var oid1 = new ObjectId("6000908b07564302da69e742");
var query = { _id: oid1};
var options = {
// sort matched documents in descending order by rating
sort: { deviceName: -1 },
// Include only the `title` and `imdb` fields in the returned document
projection: { _id: 1, deviceName: 1, deviceGroup: 1, storageKWH: 1 },
};
// console.log(`query = ${query}`);
device = await collection.findOne(query, options);
// since this method returns the matched document, not a cursor, print it directly
};

// https://docs.mongodb.com/drivers/node/usage-examples/updateOne
async function updateDevice(device, sumKWH) {
var {_id, deviceName, deviceGroup, storageKWH} = device;
var oid1 = new ObjectId(_id);
var filter = {_id: oid1}
var options = {
upsert: true
};
var updateDoc = {
$set: {
storageKWH: sumKWH,
energyStatus: "loaded"
},
};
const result = await collection.updateOne(filter, updateDoc, options );
console.log(`updateDevice "${deviceName}"" matched ${result.matchedCount} count completed with ${sumKWH}`);
};

run().catch(console.dir);
MongoDB Shell Tasks
command to migrate DBS:
mongodump ‘mongodb+srv://dbAdmin:u3KpFTzZBEIEQLzY@cluster0.pfjbe.mongodb.net’ --archive --db=ebc_qa_v2 | mongorestore ‘mongodb+srv://dbAdmin:4eTHe5hixithof8plnow@cluster0.pb6hj.mongodb.net’ --archive --nsFrom=‘ebc_qa_v2.*’ --nsTo=‘ebc_production.*’
Python - insert documents into Mongo tutorial
Robo 3T - free Mongo Client Tool
https://robomongo.org/download
easy to use
allows testing all code on Mongo: commands, javascript
has error logs
can connect to any Mongo instance that user is authorized to
create individual connections to each node in a cluster
id the primary cluster at any time by checking
db.isMaster()
db.serverStatus()
Compass - Mongo's free Client Tool
Robo3T is better BUT harder to run SSL connections to Mongo Atlas clusters
Compass does have an embeddedShell to enter many Mongo commands directly
https://docs.mongodb.com/compass/master/embedded-shell#use-the-embedded-mongodb-shell
sample use of embeddedShell in Compass
Sample find query in MongoDBShell window

What's wrong with Compass?
Data Loads - doesn't parse / edit JSON correctly – incorrect json just flags a general error - ignores specific parse errors
Data Loads - can't import CSV data with Mongo extensions ( eg ObjectId etc ). Must manually use Compass edit to change data type for each row after import
Compass overview v1.3 - DZone
https://dzone.com/articles/visualizing-your-data-with-mongodb-compass
compass-mongo-v1.3-dzone-Visualizing Your Data With MongoDB Compass.pdf gdrive
Compass docs
https://docs.mongodb.com/compass/current/import-export
You can use MongoDB Compass to import and export data to and from collections. Compass supports import and export for both JSON and CSV files. To import or export data to or from a collection, navigate to the detailed collection view by either selecting the collection from the Databases tab or clicking the collection in the left-side navigation.
Potential Value Opportunities
Potential Challenges
Candidate Solutions
Step-by-step guide for Example
sample code block