m Spring
- jim mason
- jimm1
Key Points
- Spring saves work but adds work - need to fit to use cases
JHipster is a development platform to generate, develop and deploy Spring Boot + Angular / React / Vue Web applications and Spring microservices.
JHipster is open-source
References
Key Concepts
Spring Training resources
Spring Concepts
Spring Framework
- Spring 5 Tutorials
- Spring Core Tutorials
- Spring Boot Tutorials
- Spring Batch Tutorials
- Spring Cloud Tutorials
- Spring AOP Tutorials
- Spring MVC Tutorials
- Spring Security Tutorials
- Spring ORM Tutorials
- Spring REST Tutorials
- Spring WebFlux Tutorials
Spring Core
Dependency Injection, AOP, beans
- Spring Bean Java Config Example
- Spring Bean XML Config Example
- Spring Bean Eager vs Lazy Initialization
- Spring bean scopes
- Spring Expression Language - Baeldung
Spring Boot
https://howtodoinjava.com/spring-5-tutorial/
https://spring.io/blog/2013/08/06/spring-boot-simplifying-spring-for-everyone
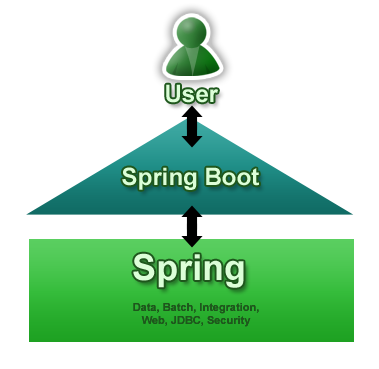
We are pleased to announce the first milestone release of a new project called Spring Boot.
Spring Boot aims to make it easy to create Spring-powered, production-grade applications and services with minimum fuss. It takes an opinionated view of the Spring platform so that new and existing users can quickly get to the bits they need. You can use it to create stand-alone Java applications that can be started using ‘java -jar’ or more traditional WAR deployments. We also provide a command line tool that runs ‘spring scripts’.
The diagram below shows Spring Boot as a point of focus on the larger Spring ecosystem. It presents a small surface area for users to approach and extract value from the rest of Spring:
The primary goals of Spring Boot are:
- To provide a radically faster and widely accessible ‘getting started’ experience for all Spring development
- To be opinionated out of the box, but get out of the way quickly as requirements start to diverge from the defaults
- To provide a range of non-functional features that are common to large classes of projects (e.g. embedded servers, security, metrics, health checks, externalized configuration)
Spring Boot does not generate code and there is absolutely no requirement for XML configuration.
Spring Scripts
Spring Boot ships with a small command line application that can be used to run ‘spring scripts’. Spring scripts are written in Groovy, which means that you have a familiar Java-like syntax, without so much boilerplate code. We are able to deduce a lot of information simply by looking at the way you have written your script. For example, here is a simple web application:
@Controller
class ThisWillActuallyRun {

    @RequestMapping("/")
    @ResponseBody
    String home() {
        return "Hello World!"
    }

}
When you run this application using ‘spring run webapp.groovy’ a number things are happening:
- Your script is enhanced with common
‘import’statements to save you typing them - We recognize the
@ResponseBodyannotation and download appropriate Spring JARs - We automatically create the Spring
@Configurationthat you would otherwise need to write - We start up an embedded servlet container and handle incoming requests on port 8080
The command line tool recognizes a number of different types of Spring Applications, including Web, Batch and Integration. There are a number of samples available in the GitHub repository.
Spring Boot with Java
You don’t need use the command line tool or write Groovy code to get the benefits of Spring Boot. We also have first class Java support. For example, here is the same application written in Java:
import org.springframework.boot.*;
import org.springframework.boot.autoconfigure.*;
import org.springframework.stereotype.*;
import org.springframework.web.bind.annotation.*;

@Controller
@EnableAutoConfiguration
public class SampleController {

    @RequestMapping("/")
    @ResponseBody
    String home() {
        return "Hello World!";
    }

    public static void main(String[] args) throws Exception {
        SpringApplication.run(SampleController.class, args);
    }
}
Other than import statements, the main difference between this example and the earlier Groovy script is the main() method that calls SpringApplication and the @EnableAutoConfiguration annotation.
Obviously with Java you also need a build system to compile and package your code. We provide a number of convenient ‘starter’ POMs that you can use with Maven, Gradle or Ant+Ivy to
Getting Started with Spring Boot and Spring Cloud
https://www.udemy.com/course/microservices-with-spring-boot-and-spring-cloud
JUST - new CLI for Spring Boot
https://www.infoq.com/news/2023/01/just-spring-boot-cli/
JUST getting started docs
https://just.maciejwalkowiak.com/docs/getting-started/
Just, a command line tool requiring zero configuration, increases the Java development experience while building Spring Boot applications. Just automatically reloads the application when there is a change in source code, build files or Docker compose files. The project also supports the creation of (native) applications and (native) Docker images.
Maciej Walkowiak, Freelance Architect & Developer, released Just exactly eleven months after the first commit. Just itself is a Spring Boot application compiled to a native binary which uses: picocli to create a rich command line application; Testcontainers to run containers in JUnit tests; Sentry for error monitoring; and JReleaser to release the project.
Just uses Spring Boot Devtools which reloads the application after the source code is changed and a build is triggered. On top of Spring Boot Devtools, Just automatically detects source code changes and compiles those changes. Furthermore, whenever the pom.xml or build.gradle change, the application is stopped, the build file refreshed and the application is started again. Unlike Spring Boot Devtools, Just also starts infrastructure services such as databases and services defined via Docker Compose whenever the run sub-command is executed. Just automatically detects the applications build configuration and uses it whenever a just command is executed. It supports Maven and Gradle, but also their respective wrappers and the Maven Daemon. Just execute the run sub-command once and it takes care of the changes in the application.
Comparable to the run sub-command, the build sub-command is translated to the proper Maven or Gradle command with the correct build goal:
just build [--quick] [--skip-test] <buildTarget>The quick option skips tests, document generation and checks such as formatting and static analysis. Just offers several buildTarget options to create a (native) application or a (native) Docker image: jar, native, image and native-image.
Based on the project's configuration, the format sub-command formats the codebase following the rules of the default settings, Spring Java Format or Spotless configuration.
A running process may be killed with the kill sub-command. By default, the process running on port 8080 is killed. Optionally, a port may be specified with the -p argument and the kill sub-command may be forced by supplying the -9 argument.
Just can be run from the command line or from IntelliJ IDEA by adding a run configuration by executing the init idea sub-command. Alternatively, the run configuration may be added manually by opening the configuration via the Run menu option and clicking on Edit Configurations. Now add a Shell Script and specify the name. The Execute option should be set to Shell Script and the Script Text to just run. After unchecking the Execute in the terminal option, the configuration can be applied. Now the Run menu option shows the name of the new shell script which can be used to start Just.
Just may be installed on MacOs with Homebrew:
brew install maciejwalkowiak/brew/justOr on Windows with Scoop:
scoop bucket add maciejwalkowiak https://github.com/maciejwalkowiak/scoop-just.git
scoop install just
Alternatively, the application may be installed manually on macOS, Windows or Linux, for example via the Linux command:
curl -Lo just.zip https://github.com/maciejwalkowiak/just/releases/latest/download/just-0.12.0-linux-x86_64.zip && unzip just.zip && chmod +x just && sudo mv just /usr/local/bin/just && just helpThe help sub-command may be used to verify the installation.
Just is not an open source project. The GitHub repository contains the binaries, release notes and issue tracker, but not the source code. Currently, the project is still in alpha status and available for free. Each release has a built-in expiration date, after which the application may be purchased or the latest release may be installed.
Spring Getting Started Guides - go here for specific framework tutorials
Go from Restful Web Services ( REST API ) to Microservices - Java , Spring Boot , Spring Cloud , Docker and Kubernetes
Spring Web apps
- Spring @GetMapping and @PostMapping Example
- Spring DispatcherServlet Tutorial
- Spring 5 MVC + Hibernate 5 Example

Spring WebFlux REST api framework
Tutorial Spring Boot WebFlux REST api
https://howtodoinjava.com/spring-webflux/spring-webflux-tutorial/
The reactive-stack web framework, Spring WebFlux, has been added Spring 5.0. It is fully non-blocking, supports reactive streams back pressure, and runs on such servers as Netty, Undertow, and Servlet 3.1+ containers. In this spring webflux tutorial, we will learn the basic concepts behind reactive programming, webflux apis and a fully functional hello world example.
Reactive programming is a programming paradigm that promotes an asynchronous, non-blocking, event-driven approach to data processing. Reactive programming involves modeling data and events as observable data streams and implementing data processing routines to react to the changes in those streams.
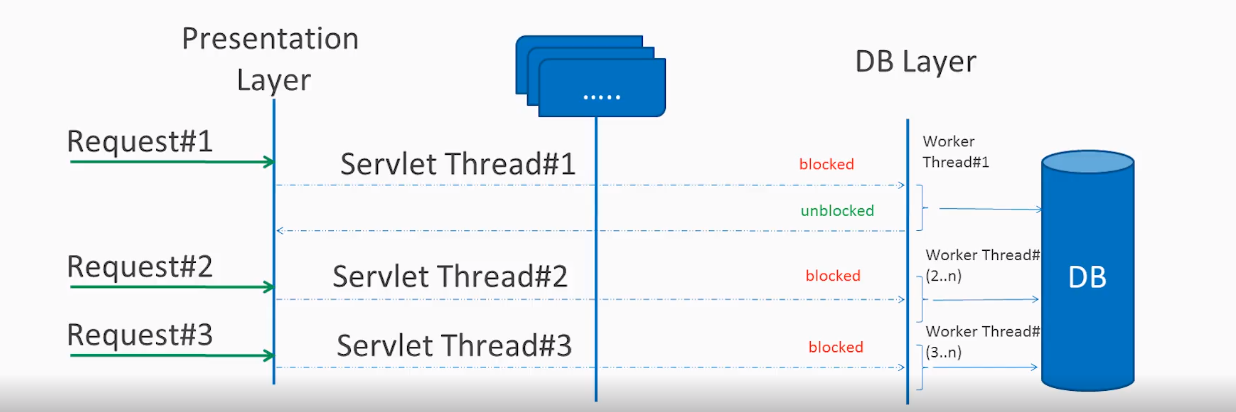
Synchronous Request Processing
Asynchronous Request Processing
non-blocking request processing means threads are not in wait states
All incoming requests come with a event handler and call back information. Request thread delegates the incoming requests to a thread pool (generally small number of threads) which delegate the request to it’s handler function and immediately start processing other incoming requests from request thread.
When the handler function is complete, one of thread from pool collect the response and pass it to the call back function.
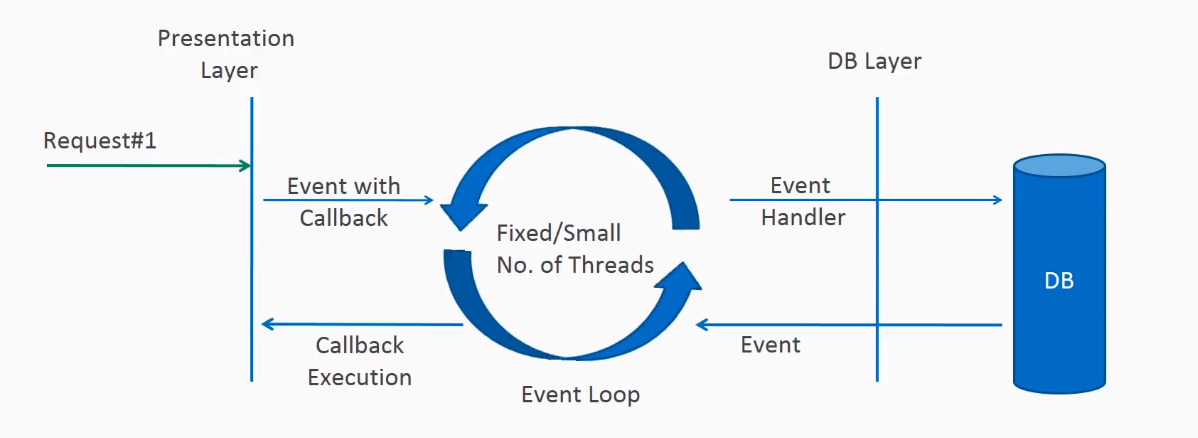
Reactive Programming
The term, “reactive,” refers to programming models that are built around reacting to changes. It is build around publisher-subscriber pattern (observer pattern). In reactive style of programming, we make a request for resource and start performing other things. When the data is available, we get the notification along with data inform of call back function. In callback function, we handle the response as per application/user needs.
One important thing to remember is back pressure. In non-blocking code, it becomes important to control the rate of events so that a fast producer does not overwhelm its destination.
Reactive web programming is great for applications that have streaming data, and clients that consume it and stream it to their users. It is not great for developing traditional CRUD applications.
Java Reactive Streams API
The new Reactive Streams API was created by engineers from Netflix, Pivotal, Lightbend, RedHat, Twitter, and Oracle, among others and is now part of Java 9. It defines four interfaces:
- Publisher: Emits a sequence of events to subscribers according to the demand received from its subscribers. A publisher can serve multiple subscribers.
It has a single method:
Publisher.javapublicinterfacePublisher<T>{publicvoidsubscribe(Subscriber<?superT> s);} - Subscriber: Receives and processes events emitted by a Publisher. Please note that no notifications will be received until
Subscription#request(long)is called to signal the demand.It has four methods to handle various kind of responses received.
Subscriber.javapublicinterfaceSubscriber<T>{publicvoidonSubscribe(Subscription s);publicvoidonNext(T t);publicvoidonError(Throwable t);publicvoidonComplete();} - Subscription: Defines a one-to-one relationship between a
Publisherand aSubscriber. It can only be used once by a singleSubscriber. It is used to both signal desire for data and cancel demand (and allow resource cleanup).Subscription.javapublicinterfaceSubscription<T>{publicvoidrequest(longn);publicvoidcancel();} - Processor: Represents a processing stage consisting of both a
Subscriberand aPublisherand obeys the contracts of both.Processor.javapublicinterfaceProcessor<T, R>extendsSubscriber<T>, Publisher<R>{}
Two popular implementations of reactive streams are RxJava (https://github.com/ReactiveX/RxJava) and Project Reactor (https://projectreactor.io/).
Reactive API questions
- how does publisher manage notifications to multiple subscribers as response rates vary?
Spring WebFlux framework for reactive applications
Spring WebFlux is parallel version of Spring MVC and supports fully non-blocking reactive streams. It support the back pressure concept and uses Netty as inbuilt server to run reactive applications. If you are familiar with Spring MVC programming style, you can easily work on webflux also.
Spring webflux uses project reactor as reactive library. Reactor is a Reactive Streams library and, therefore, all of its operators support non-blocking back pressure. It is developed in close collaboration with Spring.
Spring WebFlux heavily uses two publishers :
- Mono: Returns 0 or 1 element.
Mono<String> mono = Mono.just("Alex");Mono<String> mono = Mono.empty(); - Flux: Returns 0…N elements. A Flux can be endless, meaning that it can keep emitting elements forever. Also it can return a sequence of elements and then send a completion notification when it has returned all of its elements.
Flux<String> flux = Flux.just("A","B","C");Flux<String> flux = Flux.fromArray(newString[]{"A","B","C"});Flux<String> flux = Flux.fromIterable(Arrays.asList("A","B","C"));//To subscribe call methodflux.subscribe();
In Spring WebFlux, we call reactive apis/functions that return monos and fluxes and your controllers will return monos and fluxes. When you invoke an API that returns a mono or a flux, it will return immediately. The results of the function call will be delivered to you through the mono or flux when they become available.
To build a truly non-blocking application, we must aim to create/use all of it’s components as non-blocking i.e. client, controller, middle services and even the database. If one of them is blocking the requests, our aim will be defeated.
Spring Boot WebFlux Example
In this Spring boot 2 application, I am creating employee management system. I chosen it because, while learning, you can compare it with traditional MVC style application. To make it fully non-blocking, I am using mongodb as back-end database.
https://howtodoinjava.com/spring-webflux/spring-webflux-tutorial/
Spring Security
Spring Security. Spring Security is a framework that enables a programmer to impose security restrictions to Spring-framework–based Web applications through JEE components. In short, it is a library that can be used, extended to customize as per the programmer's needs.
https://spring.io/projects/spring-security
springsecurity-v5-181008152249.pdf
Spring_Boot_Security_Cheat_Sheet.pdf
Spring Security is a powerful and highly customizable authentication and access-control framework. It is the de-facto standard for securing Spring-based applications.
Spring Security is a framework that focuses on providing both authentication and authorization to Java applications. Like all Spring projects, the real power of Spring Security is found in how easily it can be extended to meet custom requirements
Features
Comprehensive and extensible support for both Authentication and Authorization
Protection against attacks like session fixation, clickjacking, cross site request forgery, etc
Servlet API integration
Optional integration with Spring Web MVC
Much more…
Quick start
Guides
Topics
Spring Security - Lambda DSL
https://spring.io/blog/2019/11/21/spring-security-lambda-dsl
The release of Spring Security 5.2 includes enhancements to the DSL, which allow HTTP security to be configured using lambdas.
It is important to note that the prior configuration style is still valid and supported. The addition of lambdas is intended to provide more flexibility, but their usage is optional.
You may have seen this style of configuration in the Spring Security documentation or samples.
Let us take a look at how a lambda configuration of HTTP security compares to the previous configuration style.
Configuration using lambdas
@EnableWebSecurity
public class SecurityConfig extends WebSecurityConfigurerAdapter {

    @Override
    protected void configure(HttpSecurity http) throws Exception {
        http
            .authorizeRequests(authorizeRequests ->
                authorizeRequests
                    .antMatchers("/blog/**").permitAll()
                    .anyRequest().authenticated()
            )
            .formLogin(formLogin ->
                formLogin
                    .loginPage("/login")
                    .permitAll()
            )
            .rememberMe(withDefaults());
    }
}
Equivalent configuration without using lambdas
@EnableWebSecurity
public class SecurityConfig extends WebSecurityConfigurerAdapter {

    @Override
    protected void configure(HttpSecurity http) throws Exception {
        http
            .authorizeRequests()
                .antMatchers("/blog/**").permitAll()
                .anyRequest().authenticated()
                .and()
            .formLogin()
                .loginPage("/login")
                .permitAll()
                .and()
            .rememberMe();
    }
}
Lambda DSL configuration tips
When comparing the two samples above, you will notice some key differences:
- In the Lambda DSL there is no need to chain configuration options using the
.and()method. TheHttpSecurityinstance is automatically returned for further configuration after the call to the lambda method. withDefaults()enables a security feature using the defaults provided by Spring Security. This is a shortcut for the lambda expressionit -> {}.
WebFlux Security
You may also configure WebFlux security using lambdas in a similar manner.
Below is an example configuration using lambdas.
@EnableWebFluxSecurity
public class SecurityConfig {

    @Bean
    SecurityWebFilterChain springSecurityFilterChain(ServerHttpSecurity http) {
        http
            .authorizeExchange(exchanges ->
                exchanges
                    .pathMatchers("/blog/**").permitAll()
                    .anyExchange().authenticated()
            )
            .httpBasic(withDefaults())
            .formLogin(formLogin ->
                formLogin
                    .loginPage("/login")
            );
        return http.build();
    }
}
Goals of the Lambda DSL
The Lambda DSL was created to accomplish to following goals:
- Automatic indentation makes the configuration more readable.
- The is no need to chain configuration options using
.and(). - The Spring Security DSL has a similar configuration style to other Spring DSLs such as Spring Integration and Spring Cloud Gateway.
Spring Security without the WebSecurityConfigurerAdapter
https://spring.io/blog/2022/02/21/spring-security-without-the-websecurityconfigureradapter
In Spring Security 5.7.0-M2 we deprecated the WebSecurityConfigurerAdapter, as we encourage users to move towards a component-based security configuration.
To assist with the transition to this new style of configuration, we have compiled a list of common use-cases and the suggested alternatives going forward.
In the examples below we follow best practice by using the Spring Security lambda DSL and the method HttpSecurity#authorizeHttpRequests to define our authorization rules. If you are new to the lambda DSL you can read about it in this blog post. If you would like to learn more about why we choose to use HttpSecurity#authorizeHttpRequests you can check out the reference documentation.
Spring Data
Spring REST services
https://spring.io/guides/gs/rest-service/
This guide walks you through the process of creating a "hello world" RESTful web service with Spring.
What you’ll build
You’ll build a service that will accept HTTP GET requests at:
http://localhost:8080/greeting
and respond with a JSON representation of a greeting:
{"id":1,"content":"Hello, World!"}You can customize the greeting with an optional name parameter in the query string:
http://localhost:8080/greeting?name=User
The name parameter value overrides the default value of "World" and is reflected in the response:
{"id":1,"content":"Hello, User!"}What you’ll need
About 15 minutes
A favorite text editor or IDE
JDK 1.8 or later
You can also import the code straight into your IDE:
How to complete this guide
Like most Spring Getting Started guides, you can start from scratch and complete each step, or you can bypass basic setup steps that are already familiar to you. Either way, you end up with working code.
To start from scratch, move on to Build with Gradle.
To skip the basics, do the following:
Download and unzip the source repository for this guide, or clone it using Git:
git clone https://github.com/spring-guides/gs-rest-service.gitcd into
gs-rest-service/initialJump ahead to Create a resource representation class.
When you’re finished, you can check your results against the code in gs-rest-service/complete.
Build with Gradle
Build with Maven
Build with your IDE
Create a resource representation class
Now that you’ve set up the project and build system, you can create your web service.
Begin the process by thinking about service interactions.
The service will handle GET requests for /greeting, optionally with a name parameter in the query string. The GET request should return a 200 OK response with JSON in the body that represents a greeting. It should look something like this:
{
    "id": 1,
    "content": "Hello, World!"
}
The id field is a unique identifier for the greeting, and content is the textual representation of the greeting.
To model the greeting representation, you create a resource representation class. Provide a plain old java object with fields, constructors, and accessors for the id and content data:
src/main/java/hello/Greeting.java
package hello;

public class Greeting {

    private final long id;
    private final String content;

    public Greeting(long id, String content) {
        this.id = id;
        this.content = content;
    }

    public long getId() {
        return id;
    }

    public String getContent() {
        return content;
    }
}
As you see in steps below, Spring uses the Jackson JSON library to automatically marshal instances of type Greeting into JSON. |
Next you create the resource controller that will serve these greetings.
Create a resource controller
In Spring’s approach to building RESTful web services, HTTP requests are handled by a controller. These components are easily identified by the @RestController annotation, and the GreetingController below handles GET requests for /greeting by returning a new instance of the Greeting class:
src/main/java/hello/GreetingController.java
package hello;

import java.util.concurrent.atomic.AtomicLong;
import org.springframework.web.bind.annotation.RequestMapping;
import org.springframework.web.bind.annotation.RequestParam;
import org.springframework.web.bind.annotation.RestController;

@RestController
public class GreetingController {

    private static final String template = "Hello, %s!";
    private final AtomicLong counter = new AtomicLong();

    @RequestMapping("/greeting")
    public Greeting greeting(@RequestParam(value="name", defaultValue="World") String name) {
        return new Greeting(counter.incrementAndGet(),
                            String.format(template, name));
    }
}
This controller is concise and simple, but there’s plenty going on under the hood. Let’s break it down step by step.
The @RequestMapping annotation ensures that HTTP requests to /greeting are mapped to the greeting() method.
The above example does not specify GET vs. PUT, POST, and so forth, because @RequestMapping maps all HTTP operations by default. Use @RequestMapping(method=GET) to narrow this mapping. |
@RequestParam binds the value of the query string parameter name into the name parameter of the greeting() method. If the name parameter is absent in the request, the defaultValue of "World" is used.
The implementation of the method body creates and returns a new Greeting object with id and content attributes based on the next value from the counter, and formats the given name by using the greeting template.
A key difference between a traditional MVC controller and the RESTful web service controller above is the way that the HTTP response body is created. Rather than relying on a view technology to perform server-side rendering of the greeting data to HTML, this RESTful web service controller simply populates and returns a Greeting object. The object data will be written directly to the HTTP response as JSON.
This code uses Spring 4’s new @RestController annotation, which marks the class as a controller where every method returns a domain object instead of a view. It’s shorthand for @Controller and @ResponseBody rolled together.
The Greeting object must be converted to JSON. Thanks to Spring’s HTTP message converter support, you don’t need to do this conversion manually. Because Jackson 2 is on the classpath, Spring’s MappingJackson2HttpMessageConverter is automatically chosen to convert the Greeting instance to JSON.
Make the application executable
Although it is possible to package this service as a traditional WAR file for deployment to an external application server, the simpler approach demonstrated below creates a standalone application. You package everything in a single, executable JAR file, driven by a good old Java main() method. Along the way, you use Spring’s support for embedding the Tomcat servlet container as the HTTP runtime, instead of deploying to an external instance.
src/main/java/hello/Application.java
package hello;

import org.springframework.boot.SpringApplication;
import org.springframework.boot.autoconfigure.SpringBootApplication;

@SpringBootApplication
public class Application {

    public static void main(String[] args) {
        SpringApplication.run(Application.class, args);
    }
}
@SpringBootApplication is a convenience annotation that adds all of the following:
@Configurationtags the class as a source of bean definitions for the application context.@EnableAutoConfigurationtells Spring Boot to start adding beans based on classpath settings, other beans, and various property settings. For example, if spring-webmvc is on the classpath this flags the application as a web application and activates key behaviors such as setting up aDispatcherServlet.@ComponentScantells Spring to look for other components, configurations, and services in thehellopackage, allowing it to find the controllers.
The main() method uses Spring Boot’s SpringApplication.run() method to launch an application. Did you notice that there wasn’t a single line of XML? No web.xml file either. This web application is 100% pure Java and you didn’t have to deal with configuring any plumbing or infrastructure.
Build an executable JAR
You can run the application from the command line with Gradle or Maven. Or you can build a single executable JAR file that contains all the necessary dependencies, classes, and resources, and run that. This makes it easy to ship, version, and deploy the service as an application throughout the development lifecycle, across different environments, and so forth.
If you are using Gradle, you can run the application using ./gradlew bootRun. Or you can build the JAR file using ./gradlew build. Then you can run the JAR file:
If you are using Maven, you can run the application using ./mvnw spring-boot:run. Or you can build the JAR file with ./mvnw clean package. Then you can run the JAR file:
| The procedure above will create a runnable JAR. You can also opt to build a classic WAR file instead. |
Logging output is displayed. The service should be up and running within a few seconds.
Test the service
Now that the service is up, visit http://localhost:8080/greeting, where you see:
{"id":1,"content":"Hello, World!"}Provide a name query string parameter with http://localhost:8080/greeting?name=User. Notice how the value of the content attribute changes from "Hello, World!" to "Hello, User!":
{"id":2,"content":"Hello, User!"}This change demonstrates that the @RequestParam arrangement in GreetingController is working as expected. The name parameter has been given a default value of "World", but can always be explicitly overridden through the query string.
Notice also how the id attribute has changed from 1 to 2. This proves that you are working against the same GreetingController instance across multiple requests, and that its counter field is being incremented on each call as expected.
Summary
Congratulations! You’ve just developed a RESTful web service with Spring.
See Also
The following guides may also be helpful:
Spring REST Tutorial
https://spring.io/guides/tutorials/rest/
REST has quickly become the de-facto standard for building web services on the web because they’re easy to build and easy to consume.
There’s a much larger discussion to be had about how REST fits in the world of microservices, but - for this tutorial - let’s just look at building RESTful services.
Why REST? REST embraces the precepts of the web, including its architecture, benefits, and everything else. This is no surprise given its author, Roy Fielding, was involved in probably a dozen specs which govern how the web operates.
What benefits? The web and its core protocol, HTTP, provide a stack of features:
Suitable actions (
GET,POST,PUT,DELETE, …)Caching
Redirection and forwarding
Security (encryption and authentication)
These are all critical factors on building resilient services. But that is not all. The web is built out of lots of tiny specs, hence it’s been able to evolve easily, without getting bogged down in "standards wars".
Developers are able to draw upon 3rd party toolkits that implement these diverse specs and instantly have both client and server technology at their fingertips.
So building on top of HTTP, REST APIs provide the means to build flexible APIs that can:
Support backward compatibility
Evolvable APIs
Scaleable services
Securable services
A spectrum of stateless to stateful services
What’s important to realize is that REST, however ubiquitous, is not a standard, per se, but an approach, a style, a set of constraints on your architecture that can help you build web-scale systems. In this tutorial we will use the Spring portfolio to build a RESTful service while leveraging the stackless features of REST.
Getting Started
As we work through this tutorial, we’ll use Spring Boot. Go to Spring Initializr and select the following:
Web
JPA
H2
Lombok
Then choose "Generate Project". A .zip will download. Unzip it. Inside you’ll find a simple, Maven-based project including a pom.xml build file (NOTE: You can use Gradle. The examples in this tutorial will be Maven based.)
Spring Boot can work with any IDE. You can use Eclipse, IntelliJ IDEA, Netbeans, etc. The Spring Tool Suite is an open-source, Eclipse-based IDE distribution that provides a superset of the Java EE distribution of Eclipse. It includes features that making working with Spring applications even easier. It is, by no means, required. But consider it if you want that extra oomph for your keystrokes. Here’s a video demonstrating how to get started with STS and Spring Boot. This is a general introduction to familiarize you with the tools.
If you pick up IntelliJ IDEA as your IDE for this tutorial, you have to install lombok plugin. In order to see how we install plugins in IntelliJ IDEA please have a look at managing-plugins. After this you have to ensure that "Enable annotation processing" checkbox is ticked under: Preferences → Compiler → Annotation Processors, as it is described https://stackoverflow.com/questions/14866765/building-with-lomboks-slf4j-and-intellij-cannot-find-symbol-log
The Story so Far…
Let’s start off with the simplest thing we can construct. In fact, to make it as simple as possible, we can even leave out the concepts of REST. (Later on, we’ll add REST to understand the difference.)
Our example models a simple payroll service that manages the employees of a company. Simply put, you need to store employee objects in an H2 in-memory database, and access them via JPA. This will be wrapped with a Spring MVC layer to access remotely.
package payroll;

import lombok.Data;

import javax.persistence.Entity;
import javax.persistence.GeneratedValue;
import javax.persistence.Id;

@Data
@Entity
class Employee {

  private @Id @GeneratedValue Long id;
  private String name;
  private String role;

  Employee() {}

  Employee(String name, String role) {
    this.name = name;
    this.role = role;
  }
}
Despite being small, this Java class contains much:
@Datais a Lombok annotation to create all the getters, setters,equals,hash, andtoStringmethods, based on the fields.@Entityis a JPA annotation to make this object ready for storage in a JPA-based data store.id,name, androleare the attribute for our domain object, the first being marked with more JPA annotations to indicate it’s the primary key and automatically populated by the JPA provider.a custom constructor is created when we need to create a new instance, but don’t yet have an id.
With this domain object definition, we can now turn to Spring Data JPA to handle the tedious database interactions. Spring Data repositories are interfaces with methods supporting reading, updating, deleting, and creating records against a back end data store. Some repositories also support data paging, and sorting, where appropriate. Spring Data synthesizes implementations based on conventions found in the naming of the methods in the interface.
| There are multiple repository implementations besides JPA. You can use Spring Data MongoDB, Spring Data GemFire, Spring Data Cassandra, etc. For this tutorial, we’ll stick with JPA. |
package payroll;

import org.springframework.data.jpa.repository.JpaRepository;

interface EmployeeRepository extends JpaRepository<Employee, Long> {

}
This interface extends Spring Data JPA’s JpaRepository, specifying the domain type as Employee and the id type as Long. This interface, though empty on the surface, packs a punch given it supports:
Creating new instances
Updating existing ones
Deleting
Finding (one, all, by simple or complex properties)
Spring Data’s repository solution makes it possible to sidestep data store specifics and instead solve a majority of problems using domain-specific terminology.
Believe it or not, this is enough to launch an application! A Spring Boot application is, at a minimum, a public static void main entry-point and the @SpringBootApplication annotation. This tells Spring Boot to help out, wherever possible.
package payroll;

import org.springframework.boot.SpringApplication;
import org.springframework.boot.autoconfigure.SpringBootApplication;

@SpringBootApplication
public class PayrollApplication {

  public static void main(String... args) {
    SpringApplication.run(PayrollApplication.class, args);
  }
}
@SpringBootApplication is a meta-annotation that pulls in component scanning, autoconfiguration, and property support. We won’t dive into the details of Spring Boot in this tutorial, but in essence, it will fire up a servlet container and serve up our service.
Nevertheless, an application with no data isn’t very interesting, so let’s preload it. The follow class will get loaded automatically by Spring:
package payroll;

import lombok.extern.slf4j.Slf4j;

import org.springframework.boot.CommandLineRunner;
import org.springframework.context.annotation.Bean;
import org.springframework.context.annotation.Configuration;

@Configuration
@Slf4j
class LoadDatabase {

  @Bean
  CommandLineRunner initDatabase(EmployeeRepository repository) {
    return args -> {
      log.info("Preloading " + repository.save(new Employee("Bilbo Baggins", "burglar")));
      log.info("Preloading " + repository.save(new Employee("Frodo Baggins", "thief")));
    };
  }
}
What happens when it gets loaded?
Spring Boot will run ALL
CommandLineRunnerbeans once the application context is loaded.This runner will request a copy of the
EmployeeRepositoryyou just created.Using it, it will create two entities and store them.
@Slf4jis a Lombok annotation to autocreate an Slf4j-basedLoggerFactoryaslog, allowing us to log these newly created "employees".
Right-click and Run PayRollApplication, and this is what you get:
...
2018-08-09 11:36:26.169  INFO 74611 --- [main] payroll.LoadDatabase : Preloading Employee(id=1, name=Bilbo Baggins, role=burglar)
2018-08-09 11:36:26.174  INFO 74611 --- [main] payroll.LoadDatabase : Preloading Employee(id=2, name=Frodo Baggins, role=thief)
...
This isn’t the whole log, but just the key bits of preloading data. (Indeed, check out the whole console. It’s glorious.)
HTTP is the Platform
To wrap your repository with a web layer, you must turn to Spring MVC. Thanks to Spring Boot, there is little in infrastructure to code. Instead, we can focus on actions:
package payroll;

import java.util.List;

import org.springframework.web.bind.annotation.DeleteMapping;
import org.springframework.web.bind.annotation.GetMapping;
import org.springframework.web.bind.annotation.PathVariable;
import org.springframework.web.bind.annotation.PostMapping;
import org.springframework.web.bind.annotation.PutMapping;
import org.springframework.web.bind.annotation.RequestBody;
import org.springframework.web.bind.annotation.RestController;

@RestController
class EmployeeController {

  private final EmployeeRepository repository;

  EmployeeController(EmployeeRepository repository) {
    this.repository = repository;
  }

  // Aggregate root

  @GetMapping("/employees")
  List<Employee> all() {
    return repository.findAll();
  }

  @PostMapping("/employees")
  Employee newEmployee(@RequestBody Employee newEmployee) {
    return repository.save(newEmployee);
  }

  // Single item

  @GetMapping("/employees/{id}")
  Employee one(@PathVariable Long id) {

    return repository.findById(id)
      .orElseThrow(() -> new EmployeeNotFoundException(id));
  }

  @PutMapping("/employees/{id}")
  Employee replaceEmployee(@RequestBody Employee newEmployee, @PathVariable Long id) {

    return repository.findById(id)
      .map(employee -> {
        employee.setName(newEmployee.getName());
        employee.setRole(newEmployee.getRole());
        return repository.save(employee);
      })
      .orElseGet(() -> {
        newEmployee.setId(id);
        return repository.save(newEmployee);
      });
  }

  @DeleteMapping("/employees/{id}")
  void deleteEmployee(@PathVariable Long id) {
    repository.deleteById(id);
  }
}@RestControllerindicates that the data returned by each method will be written straight into the response body instead of rendering a template.An
EmployeeRepositoryis injected by constructor into the controller.We have routes for each operations (
@GetMapping,@PostMapping,@PutMappingand@DeleteMapping, corresponding to HTTPGET,POST,PUT, andDELETEcalls). (NOTE: It’s useful to read each method and understand what they do.)EmployeeNotFoundExceptionis an exception used to indicate when an employee is looked up but not found.
package payroll;

class EmployeeNotFoundException extends RuntimeException {

  EmployeeNotFoundException(Long id) {
    super("Could not find employee " + id);
  }
}
When an EmployeeNotFoundException is thrown, this extra tidbit of Spring MVC configuration is used to render an HTTP 404:
package payroll;

import org.springframework.http.HttpStatus;
import org.springframework.web.bind.annotation.ControllerAdvice;
import org.springframework.web.bind.annotation.ExceptionHandler;
import org.springframework.web.bind.annotation.ResponseBody;
import org.springframework.web.bind.annotation.ResponseStatus;

@ControllerAdvice
class EmployeeNotFoundAdvice {

  @ResponseBody
  @ExceptionHandler(EmployeeNotFoundException.class)
  @ResponseStatus(HttpStatus.NOT_FOUND)
  String employeeNotFoundHandler(EmployeeNotFoundException ex) {
    return ex.getMessage();
  }
}@ResponseBodysignals that this advice is rendered straight into the response body.@ExceptionHandlerconfigures the advice to only respond if anEmployeeNotFoundExceptionis thrown.@ResponseStatussays to issue anHttpStatus.NOT_FOUND, i.e. an HTTP 404.The body of the advice generates the content. In this case, it gives the message of the exception.
To launch the application, either right-click the public static void main in PayRollApplication and select Run from your IDE, or:
Spring Initializr uses maven wrapper so type this:
$ ./mvnw clean spring-boot:run
Alternatively using your installed maven version type this:
$ mvn clean spring-boot:run
When the app starts, we can immediately interrogate it.
$ curl -v localhost:8080/employees
This will yield:
*   Trying ::1...
* TCP_NODELAY set
* Connected to localhost (::1) port 8080 (#0)
> GET /employees HTTP/1.1
> Host: localhost:8080
> User-Agent: curl/7.54.0
> Accept: */*
>
< HTTP/1.1 200
< Content-Type: application/json;charset=UTF-8
< Transfer-Encoding: chunked
< Date: Thu, 09 Aug 2018 17:58:00 GMT
<
* Connection #0 to host localhost left intact
[{"id":1,"name":"Bilbo Baggins","role":"burglar"},{"id":2,"name":"Frodo Baggins","role":"thief"}]
Here you can see the pre-loaded data, in a compacted format.
If you try and query a user that doesn’t exist…
$ curl -v localhost:8080/employees/99
You get…
*   Trying ::1...
* TCP_NODELAY set
* Connected to localhost (::1) port 8080 (#0)
> GET /employees/99 HTTP/1.1
> Host: localhost:8080
> User-Agent: curl/7.54.0
> Accept: */*
>
< HTTP/1.1 404
< Content-Type: text/plain;charset=UTF-8
< Content-Length: 26
< Date: Thu, 09 Aug 2018 18:00:56 GMT
<
* Connection #0 to host localhost left intact
Could not find employee 99
This message nicely shows an HTTP 404 error with the custom message Could not find employee 99.
It’s not hard to show the currently coded interactions…
$ curl -X POST localhost:8080/employees -H 'Content-type:application/json' -d '{"name": "Samwise Gamgee", "role": "gardener"}'Creates a new Employee record, and then sends the content back to us:
{"id":3,"name":"Samwise Gamgee","role":"gardener"}You can alter the user:
$ curl -X PUT localhost:8080/employees/3 -H 'Content-type:application/json' -d '{"name": "Samwise Gamgee", "role": "ring bearer"}'Updates the user:
{"id":3,"name":"Samwise Gamgee","role":"ring bearer"}| Depending on how you construct your service can have significant impacts. In this situation, replace is a better description than update. For example, if the name was NOT provided, it would instead get nulled out. |
And you can delete…
$ curl -X DELETE localhost:8080/employees/3
$ curl localhost:8080/employees/3
Could not find employee 3
This is all well and good, but do we have RESTful service yet? (If you didn’t catch the hint, the answer is no.)
What’s missing?
What makes something RESTful?
So far, you have a web-based service that handles the core operations involving employee data. But that’s not enough to make things "RESTful".
Pretty URLs like /employees/3 aren’t REST.
Merely using
GET,POST, etc. aren’t REST.Having all the CRUD operations laid out aren’t REST.
In fact, what we have built so far is better described as RPC (Remote Procedure Call). That’s because there is no way to know how to interact with this service. If you published this today, you’d also have to write a document or host a developer’s portal somewhere with all the details.
This statement of Roy Fielding may further lend a clue to the difference between REST and RPC:
I am getting frustrated by the number of people calling any HTTP-based interface a REST API. Today’s example is the SocialSite REST API. That is RPC. It screams RPC. There is so much coupling on display that it should be given an X rating.

What needs to be done to make the REST architectural style clear on the notion that hypertext is a constraint? In other words, if the engine of application state (and hence the API) is not being driven by hypertext, then it cannot be RESTful and cannot be a REST API. Period. Is there some broken manual somewhere that needs to be fixed?
The side effect of NOT including hypermedia in our representations is that clients MUST hard code URIs to navigate the API. This leads to the same brittle nature that predated the rise of e-commerce on the web. It’s a signal that our JSON output needs a little help.
Introducing Spring HATEOAS, a Spring project aimed at helping you write hypermedia-driven outputs. To upgrade your service to being RESTful, add this to your build:
<dependency>
	<groupId>org.springframework.boot</groupId>
	<artifactId>spring-boot-starter-hateoas</artifactId>
</dependency>
This tiny library will give us the constructs to define a RESTful service and then render it in an acceptible format for client consumption.
A critical ingredient to any RESTful service is adding links to relevant operations. To make your controller more RESTful, add links like this:
@GetMapping("/employees/{id}")
Resource<Employee> one(@PathVariable Long id) {

  Employee employee = repository.findById(id)
    .orElseThrow(() -> new EmployeeNotFoundException(id));

  return new Resource<>(employee,
    linkTo(methodOn(EmployeeController.class).one(id)).withSelfRel(),
    linkTo(methodOn(EmployeeController.class).all()).withRel("employees"));
}
This is very similar to what we had before, but a few things have changed:
The return type of the method has changed from
EmployeetoResource<Employee>.Resource<T>is a generic container from Spring HATEOAS that includes not only the data but a collection of links.linkTo(methodOn(EmployeeController.class).one(id)).withSelfRel()asks that Spring HATEOAS build a link to theEmployeeController'sone()method, and flag it as a self link.linkTo(methodOn(EmployeeController.class).all()).withRel("employees")asks Spring HATEOAS to build a link to the aggregate root,all(), and call it "employees".
What do we mean by "build a link"? One of Spring HATEOAS’s core types is Link. It includes a URI and a rel (relation). Links are what empower the web. Before the World Wide Web, other document systems would render information or links, but it was the linking of documents WITH data that stitched the web together.
Roy Fielding encourages building APIs with the same techniques that made the web successful, and links are one of them.
If you restart the application and query the employee record of Bilbo, you’ll get a slightly different response than earlier:
{
  "id": 1,
  "name": "Bilbo Baggins",
  "role": "burglar",
  "_links": {
    "self": {
      "href": "http://localhost:8080/employees/1"
    },
    "employees": {
      "href": "http://localhost:8080/employees"
    }
  }
}
This decompressed output shows not only the data elements you saw earlier (id, name and role), but also a _links entry containing two URIs. This entire document is formatted using HAL.
HAL is a lightweight mediatype that allows encoding not just data but also hypermedia controls, alerting consumers to other parts of the API they can navigate toward. In this case, there is a "self" link (kind of like a this statement in code) along with a link back to the aggregate root.
To make the aggregate root ALSO more RESTful, you want to include top level links while ALSO including any RESTful components within:
@GetMapping("/employees")
Resources<Resource<Employee>> all() {

  List<Resource<Employee>> employees = repository.findAll().stream()
    .map(employee -> new Resource<>(employee,
      linkTo(methodOn(EmployeeController.class).one(employee.getId())).withSelfRel(),
      linkTo(methodOn(EmployeeController.class).all()).withRel("employees")))
    .collect(Collectors.toList());

  return new Resources<>(employees,
    linkTo(methodOn(EmployeeController.class).all()).withSelfRel());
}
Wow! That method, which used to just be repository.findAll() has grown big! Let’s unpack it.
Resources<> is another Spring HATEOAS container aimed at encapsulating collections. It, too, also lets you include links. Don’t let that first statement slip by. When does "encapsulating collections" mean? Collections of employees?
Not quite.
Tutorial - Spring Boot CRUD with Angular 9
https://developer.okta.com/blog/2020/01/06/crud-angular-9-spring-boot-2
Angular 9’s most prominent new feature is Ivy. Ivy is Angular’s new compiler and renderer. The renderer is the engine that takes your components and templates and translates them into instructions that manipulate the DOM. Ivy is an internal component, so you don’t interact with it directly. However, it can have a significant impact on your code, yielding much smaller JavaScript bundles and increasing performance.
Spring Boot 2.2 was released in September 2019 and focuses on performance improvements and reduced memory usage. It adds Java 13 support, RSocket support, and the ability to group health indicators. Grouping indicators can be useful if you’re deploying to Kubernetes and want different groups for "liveness" and "readiness" probes.
In this post, I’ll show you how to build a CRUD application with Angular 9 and Spring Boot 2.2. Along the way, I’ll do my best to weave in security tips and how to make your apps more secure.
Prerequisites:
- What’s New In Angular 9?
- What’s New in Spring Boot 2.2?
- Create an Angular 9 App
- Add Angular Authentication using OpenID Connect
- Create a Spring Boot 2.2 App
- Add a Notes REST API with Spring Data REST
- Add a Notes CRUD Feature in Angular
- Lock Down Spring Boot with Recommended Security Practices
- Learn More about Angular, Spring Boot, and Kotlin
Angular 9 Spring Boot 2.2 Video Tutorial
Tutorial - Simple CRUD services with React, Spring Boot and JHipster
https://developer.okta.com/blog/2022/06/17/simple-crud-react-and-spring-boot
jhipster-crud-developer.oktacom-Use React and Spring Boot to Build a Simple CRUD App.pdf link
jhipster-crud-developer.okta.com-Use React and Spring Boot to Build a Simple CRUD App.pdf file
React was designed to make it painless to create interactive UIs. Its state management is efficient and only updates components when your data changes. Component logic is written in JavaScript, meaning you can keep state out of the DOM and create encapsulated components.
Developers like CRUD (create, read, update, and delete) apps because they show a lot of the base functionality you need when creating an app. Once you have the basics of CRUD completed in an app, most of the client-server plumbing is finished, and you can move on to implementing the necessary business logic.
Today, I’ll show you how to create a basic CRUD app with Spring Boot and React. In this tutorial, I’ll use the OAuth 2.0 Authorization Code flow and package the React app in the Spring Boot app for production. At the same time, I’ll show you how to keep React’s productive workflow for developing locally.
You will need Java 17 and Node 16 installed to complete this tutorial.
- Create an API app with Spring Boot
- Create a React UI with Create React App
- Call your Spring Boot API and display the results
- Build a React
GroupListcomponent - Add a React
GroupEditcomponent - Add authentication with Okta
- Configure Spring Security for React and user identity
- Modify React to handle CSRF and be identity-aware
- Configure Maven to build and package React with Spring Boot
- Learn more about Spring Boot and React
Building Microservices Architectural Applications using Spring Boot.pdf on Spring Cloud link
help you to understand the theoretical concepts of Microservices and how it practically used for spring boot. The following points will consider in this article — Part 01 ->
Testing Spring Boot Applications: Best Practices and Frameworks.. medium
medium.com-Testing Spring Boot Applications Best Practices.pdf. link
medium.com-Testing Spring Boot Applications Best Practices.pdf. file
Testing is an integral part of software development. It ensures that your Spring Boot applications work as expected and continue to do so as they evolve. In this article, we’ll explore how to test Spring Boot applications using best practices and tools.
Why Testing Matters
Testing is crucial for several reasons:
- Reliability: It ensures your application performs correctly and reliably.
- Bug Detection: It helps identify and fix issues early in development.
- Refactoring: It allows for code refactoring with confidence so existing functionality won’t break.
- Documentation: Well-written tests serve as living documentation for your code.
Types of Testing
Spring Boot applications can be tested at various levels, including:
- Unit Testing: Testing individual components, such as classes or methods, in isolation.
- Integration Testing: Verifying that different components or services work correctly together.
- Functional Testing: Testing the application’s functionality from the user’s perspective.
- End-to-End Testing: Testing the entire application, including its external dependencies, in a production-like environment.
Spring Cloud
Spring Cloud Webinar notes
Spring Cloud Webinar notes gdoc link
https://docs.google.com/document/d/1t402nm0BzAtweNZBwonuh7j91dzyaeAmT7w7-ZOoNWM/edit?usp=sharing
https://spring.io/projects/spring-cloud
Spring Cloud provides tools for developers to quickly build some of the common patterns in distributed systems (e.g. configuration management, service discovery, circuit breakers, intelligent routing, micro-proxy, control bus, one-time tokens, global locks, leadership election, distributed sessions, cluster state). Coordination of distributed systems leads to boiler plate patterns, and using Spring Cloud developers can quickly stand up services and applications that implement those patterns. They will work well in any distributed environment, including the developer’s own laptop, bare metal data centres, and managed platforms such as Cloud Foundry.
Features
Spring Cloud focuses on providing good out of box experience for typical use cases and extensibility mechanism to cover others.
Distributed/versioned configuration
Service registration and discovery
Routing
Service-to-service calls
Load balancing
Circuit Breakers
Global locks
Leadership election and cluster state
Distributed messaging
Spring Cloud takes a very declarative approach, and often you get a lot of features with just a classpath change and/or an annotation
Spring Cloud projects list
Spring Cloud Config
Centralized external configuration management backed by a git repository. The configuration resources map directly to Spring Environment but could be used by non-Spring applications if desired.
Spring Cloud Netflix
Integration with various Netflix OSS components (Eureka, Hystrix, Zuul, Archaius, etc.).
Spring Cloud Bus
An event bus for linking services and service instances together with distributed messaging. Useful for propagating state changes across a cluster (e.g. config change events).
Spring Cloud Cloudfoundry
Integrates your application with Pivotal Cloud Foundry. Provides a service discovery implementation and also makes it easy to implement SSO and OAuth2 protected resources.
Spring Cloud Open Service Broker
Provides a starting point for building a service broker that implements the Open Service Broker API.
Spring Cloud Cluster
Leadership election and common stateful patterns with an abstraction and implementation for Zookeeper, Redis, Hazelcast, Consul.
Spring Cloud Consul
Service discovery and configuration management with Hashicorp Consul.
Spring Cloud Security
Provides support for load-balanced OAuth2 rest client and authentication header relays in a Zuul proxy.
Spring Cloud Sleuth
Distributed tracing for Spring Cloud applications, compatible with Zipkin, HTrace and log-based (e.g. ELK) tracing.
Spring Cloud Data Flow
A cloud-native orchestration service for composable microservice applications on modern runtimes. Easy-to-use DSL, drag-and-drop GUI, and REST-APIs together simplifies the overall orchestration of microservice based data pipelines.
Spring Cloud Stream
A lightweight event-driven microservices framework to quickly build applications that can connect to external systems. Simple declarative model to send and receive messages using Apache Kafka or RabbitMQ between Spring Boot apps.
Spring Cloud Stream App Starters
Spring Cloud Stream App Starters are Spring Boot based Spring Integration applications that provide integration with external systems.
Spring Cloud Task
A short-lived microservices framework to quickly build applications that perform finite amounts of data processing. Simple declarative for adding both functional and non-functional features to Spring Boot apps.
Spring Cloud Task App Starters
Spring Cloud Task App Starters are Spring Boot applications that may be any process including Spring Batch jobs that do not run forever, and they end/stop after a finite period of data processing.
Spring Cloud Zookeeper
Service discovery and configuration management with Apache Zookeeper.
Spring Cloud Connectors
Makes it easy for PaaS applications in a variety of platforms to connect to backend services like databases and message brokers (the project formerly known as "Spring Cloud").
Spring Cloud Starters
Spring Boot-style starter projects to ease dependency management for consumers of Spring Cloud. (Discontinued as a project and merged with the other projects after Angel.SR2.)
Spring Cloud CLI
Spring Boot CLI plugin for creating Spring Cloud component applications quickly in Groovy
Spring Cloud Contract
Spring Cloud Contract is an umbrella project holding solutions that help users in successfully implementing the Consumer Driven Contracts approach.
Spring Cloud Gateway
Spring Cloud Gateway is an intelligent and programmable router based on Project Reactor.
Spring Cloud OpenFeign
Spring Cloud OpenFeign provides integrations for Spring Boot apps through autoconfiguration and binding to the Spring Environment and other Spring programming model idioms.
Spring Cloud Pipelines
Spring Cloud Pipelines provides an opinionated deployment pipeline with steps to ensure that your application can be deployed in zero downtime fashion and easilly rolled back of something goes wrong.
Spring Cloud Function
Spring Cloud Function promotes the implementation of business logic via functions. It supports a uniform programming model across serverless providers, as well as the ability to run standalone (locally or in a PaaS).
Spring Cloud Message Broker
https://spring.io/projects/spring-cloud-bus
links nodes of a distributed system with a lightweight message broker. This can then be used to broadcast state changes (e.g. configuration changes) or other management instructions. AMQP and Kafka broker implementations are included with the project. Alternatively, any Spring Cloud Stream binder found on the classpath will work out of the box as a transport.
Spring Cloud Data Stream with message, Kafka services
https://developer.okta.com/blog/2020/04/15/spring-cloud-stream
spring-cloud-stream-for-messaging-developer.okta.com-A Quick Guide to Spring Cloud Stream.pdf
Build Mobile Apps with Angular, Ionic 4, and Spring Boot
https://developer.okta.com/blog/2019/06/24/ionic-4-angular-spring-boot-jhipster
JHipster is an application generator, and platform, for building Java apps with JavaScript frontends.
see Grails Angular profile as an option.
Spring Boot is the only backend framework currently supported, with .NET and Node.js implementations currently in development. On the frontend, Angular, React, Vue, React Native, and Ionic are all supported.
In this brief tutorial, I’ll show you to use Ionic for JHipster v4 with Spring Boot and JHipster 6.
To complete this tutorial, you’ll need to have Java 8+, Node.js 10+, and Docker installed. You’ll also need to create an Okta developer account.
Potential Value Opportunities
Potential Challenges
Candidate Solutions
Okta - Identity Management - Java, Node.js, more
https://dev-896837.okta.com/login/login.htm
dev login
quickstart panel - learn Okta
https://support.okta.com/help/s/

Documentation
Read our reference guides about how to use Okta
Keycloak - an Open Source Identity and Access Management solution
https://github.com/keycloak/keycloak
Step-by-step guide for Example
sample code block